Running two terminal sessions at once to act as both client and server for a setuid binary and why understanding Unix job control and multi-session workflows matters in real investigation work.
Introduction
Day 20. Bandit Level 20 to Level 21. This level cannot be solved in a single terminal window the way every previous level has been. There is a setuid binary that connects out to a port on localhost and expects to read the current level’s password from whatever is listening there. To solve it, something has to actually be listening on that port, ready to send the password back. That means running two things at once: a listener waiting for the connection, and the binary itself making that connection.
This level introduces the practical reality of multi-session work. Up to now, every level has been one terminal, one sequence of commands, one result. This level requires either two separate terminal windows or a deliberate use of Unix job control to run a background listener while the foreground process connects to it. Both approaches are valid and both are commonly used in real investigative and testing work.
By the end of this article you will understand how nc -l sets up a listener, how a setuid binary can be made to connect to your own controlled service, and why testing a tool against your own listener before trusting its behaviour is a sound security practice.
Level Objective
There is a setuid binary in the homedirectory that does the following: it makes a connection to localhost on the port you specify as a commandline argument. It then reads a line of text from the connection and compares it to the password in the previous level (bandit20). If the password is correct, it will transmit the password for the next level (bandit21). The official page includes a hint worth taking literally: try connecting to your own network daemon to see if it works as expected. The suggested commands include ssh, nc, cat, bash, screen, tmux and Unix job control tools like bg, fg and jobs.
Approach
I connected from my local Kali machine using the password retrieved from the previous level:
ssh [email protected] -p 2220
The full Bandit ASCII art banner loaded and the prompt changed to bandit20@bandit:~$.


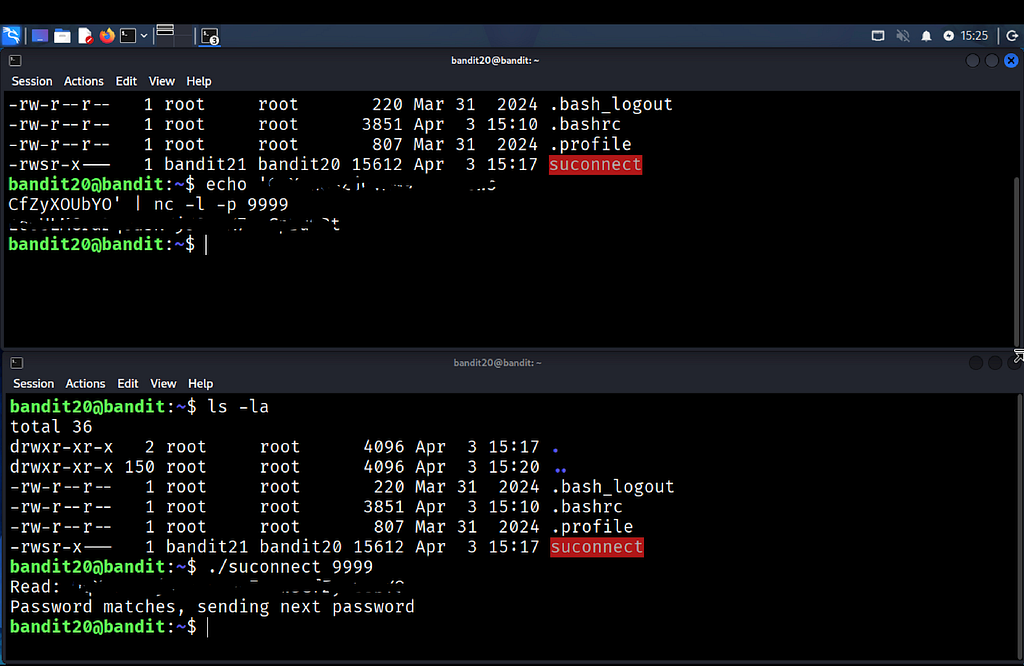
I ran ls -la and found a setuid binary called suconnect, owned by bandit21 with group bandit20, permissions -rwsr-x---. The setuid bit confirmed this binary would execute with bandit21's privileges, consistent with what I learned in Day 19.
This level required two terminal sessions open simultaneously. In the first terminal I set up a listener on a high port using Netcat, with the current level’s password piped in as the response the listener would send once a connection arrived:
echo 'bandit20password' | nc -l -p 9999
This command started Netcat listening on port 9999 and held the password ready to transmit the moment something connected.
In the second terminal, still logged in as bandit20, I ran the setuid binary, pointing it at the same port my listener was using:
./suconnect 9999
The binary connected to my listener, read the password I had echoed in, compared it against the real password for bandit20 and confirmed a match. The terminal printed Password matches, sending next password, and the password for Level 21 was transmitted back through the connection.
Commands Used
# Connect to the Bandit server as bandit20 using the Level 20 password
ssh [email protected] -p 2220
# List the home directory to find the setuid binary
ls -la
# In Terminal 1: start a listener on a chosen port with the current password ready to send
echo 'bandit20password' | nc -l -p 9999
# In Terminal 2: run the setuid binary pointed at the same port
./suconnect 9999
Command Breakdown
echo 'bandit20password' | nc -l -p 9999 Starts Netcat in listening mode on port 9999. The -l flag tells Netcat to listen for an incoming connection rather than initiate one. The -p flag specifies the port to listen on. The password piped in through echo becomes the data Netcat sends the moment a client connects.
./suconnect 9999 Runs the setuid binary with 9999 as the port argument. The binary connects out to localhost:9999, which is exactly where the listener from the first terminal is waiting. It reads whatever data the listener sends, compares it to the real bandit20 password stored on the system and responds accordingly.
Two terminal sessions This level cannot be completed in a single command sequence because one process must be listening while another connects. Running two SSH sessions to the same server, or using tools like screen or tmux to manage multiple sessions within one connection, are both valid approaches to satisfy this requirement.
-rwsr-x--- The setuid permission on suconnect, identical in structure to bandit20-do from the previous level. It means the binary executes with the privileges of its owner, bandit21, which is what allows it to read and transmit bandit21's password upon a successful match.
Lesson Learned
The main technical takeaway is that some tasks genuinely require concurrent processes, and a single terminal session is not always enough. Understanding how to either open a second session or use Unix job control to background one process while running another in the foreground is a practical skill that this level forces you to learn by necessity rather than by explanation.
The hint to “try connecting to your own network daemon” turned out to be the entire solution. Rather than guessing what the binary expects, setting up a controlled listener and observing exactly how the binary behaves against it removes all ambiguity. That mirrors how security testing works in general: control one side of an interaction completely so you can study the other side’s behaviour with certainty.
The setuid mechanism from Day 19 reappears here in a more advanced form. Instead of a binary that simply runs a command as another user, this one performs a network operation and a password check, all while running with elevated effective permissions. The underlying concept is identical even though the binary’s behaviour is more complex.
- nc -l -p PORT — start a Netcat listener on a specified port
- echo 'data' | nc -l -p PORT — listen and immediately send data to the first client that connects
- screen or tmux — manage multiple terminal sessions within a single SSH connection
- jobs, bg, fg — Unix job control commands for managing background and foreground processes
- Ctrl+Z — suspend a running process to the background within the same terminal
🔴 SOC Analyst Insight
Testing a tool or service against a controlled listener before trusting its behaviour in a live environment is a standard practice in both security tooling development and incident response. Before deploying a custom script that connects to a remote service, analysts often stand up a local listener to observe exactly what data the tool sends and expects to receive, removing any guesswork about its behaviour.
# Stand up a controlled listener to observe outbound connection behaviour from an unfamiliar binary
nc -lvp 4444
The command above starts a verbose listener that logs connection details as they arrive. During malware analysis, running a suspicious binary in an isolated environment while a listener like this captures its outbound connection attempts is one of the most direct ways to understand what a piece of software is trying to communicate and where. This Bandit level builds exactly that instinct: control your own end of the connection so the other end’s behaviour becomes fully observable.
Key Takeaway
Not every problem can be solved within a single terminal session. This level required running a listener and a client simultaneously, which is a foundational requirement in network testing, malware analysis and many real investigative workflows. Setting up a controlled listener to observe and validate the exact behaviour of an unfamiliar binary, rather than guessing, is the professional approach to handling any tool whose behaviour is not fully documented. The setuid mechanism from the previous level returns here in a more advanced context, reinforcing that the same core concepts appear repeatedly across increasingly complex problems.
30-Day Cybersecurity Learning Journey — Progress
🟢 Open Day — Setup & Series Introduction  | OverTheWire Bandit
✅ Day 0.   — Bandit Level 0               | First Login
✅ Day 1.   — Bandit Level 1 → 2           | Special Characters
✅ Day 2.   — Bandit Level 2 → 3           | Spaces in Filenames
✅ Day 3.   — Bandit Level 3 → 4           | Hidden Files
✅ Day 4.   — Bandit Level 4 → 5           | File Types
✅ Day 5.   — Bandit Level 5 → 6           | find with Properties
✅ Day 6.   — Bandit Level 6 → 7           | find across Filesystem
✅ Day 7.   — Bandit Level 7 → 8           | grep
✅ Day 8.   — Bandit Level 8 → 9           | sort and uniq
✅ Day 9.   — Bandit Level 9 → 10          | strings and grep
✅ Day 10.  — Bandit Level 10 → 11         | base64
✅ Day 11.  — Bandit Level 11 → 12         | ROT13 and tr
✅ Day 12.  — Bandit Level 12 → 13         | hexdump and compression
✅ Day 13.  — Bandit Level 13 → 14         | SSH keys
✅ Day 14.  — Bandit Level 14 → 15         | Netcat
✅ Day 15.  — Bandit Level 15 → 16         | SSL and OpenSSL
✅ Day 16.  — Bandit Level 16 → 17         | Port Scanning
✅ Day 17.  — Bandit Level 17 → 18         | diff
✅ Day 18.  — Bandit Level 18 → 19         | SSH command execution
✅ Day 19.  — Bandit Level 19 → 20         | Setuid binaries
✅ Day 20.  — Bandit Level 20 → 21         | Network services  ← today
⬜ Day 21.  — Bandit Level 21 → 22         | coming next
Follow along with the series as I document each level, command and lesson learned.
Control your own end of the connection and the other end has nowhere left to hide its behaviour.
OverTheWire Bandit Walkthrough — Level 20 → 21 | 30-Day Cybersecurity Learning Journey (Day 20) was originally published in System Weakness on Medium, where people are continuing the conversation by highlighting and responding to this story.